Wednesday, May 19, 2021

Abstract Bird Art

My painting is for the birds lately...literally.


I found a tutorial on how to paint an abstract bird on Pinterest.

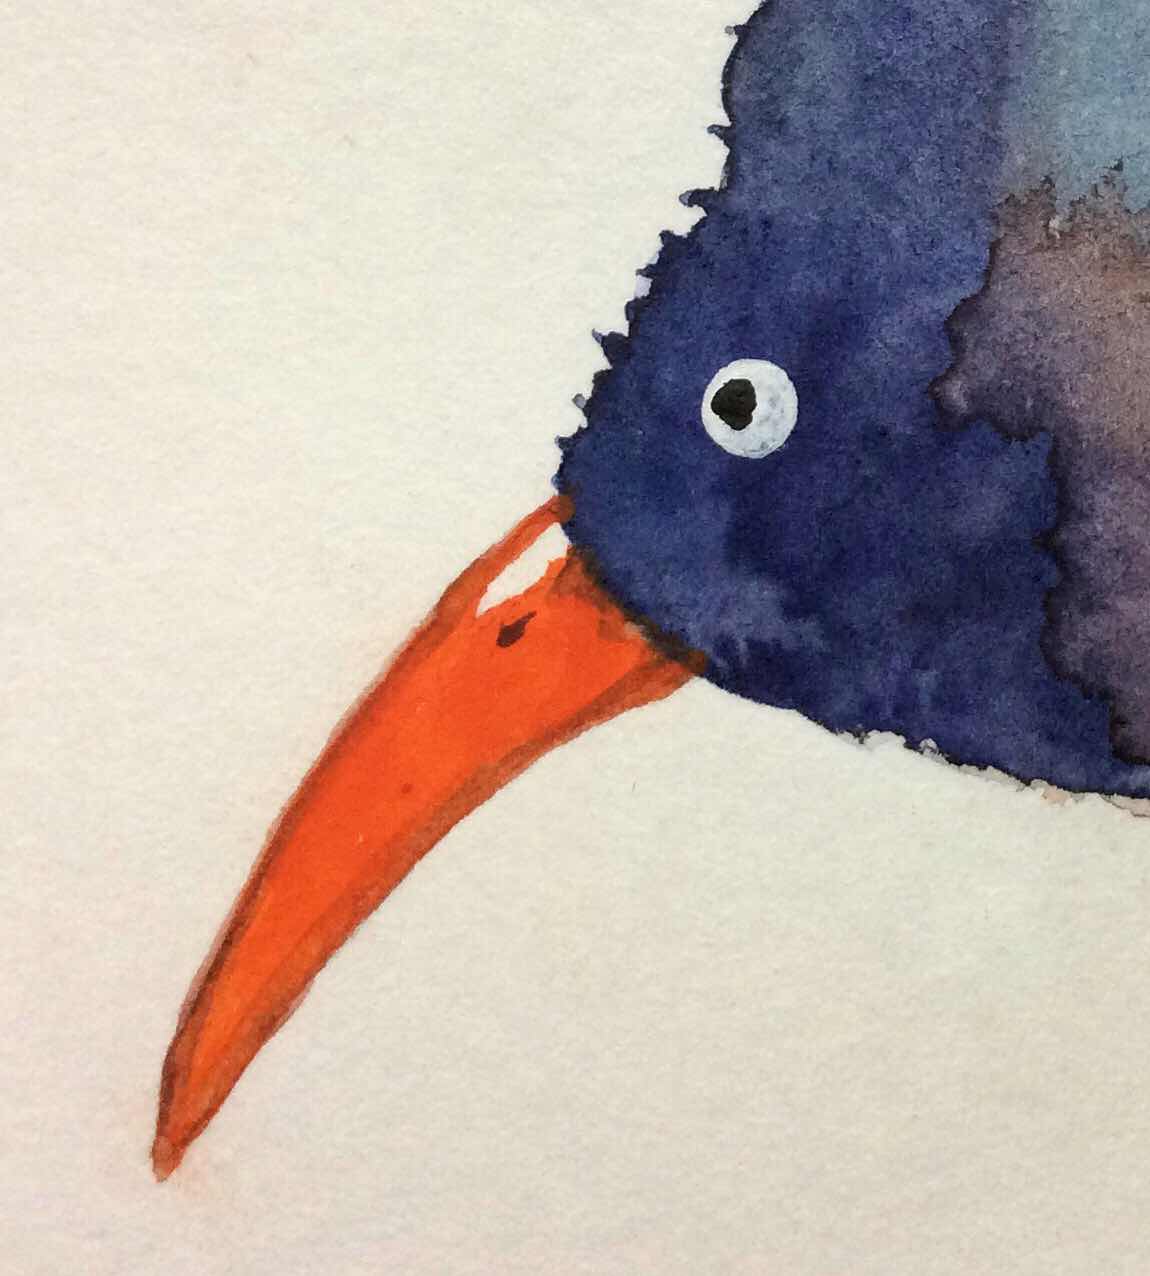
I received a very nice gift of Prima Marketing watercolors for my birthday.  This set is Essence.  I wanted to give them a real try.


And here is my result.  Although I struggle to work correctly with watercolors, I am pretty pleased with my fuzzy bird result.  I used Vermilion Neocolor II crayon for his bright color beak and legs.  White and black acrylic paint for his eye and spots.


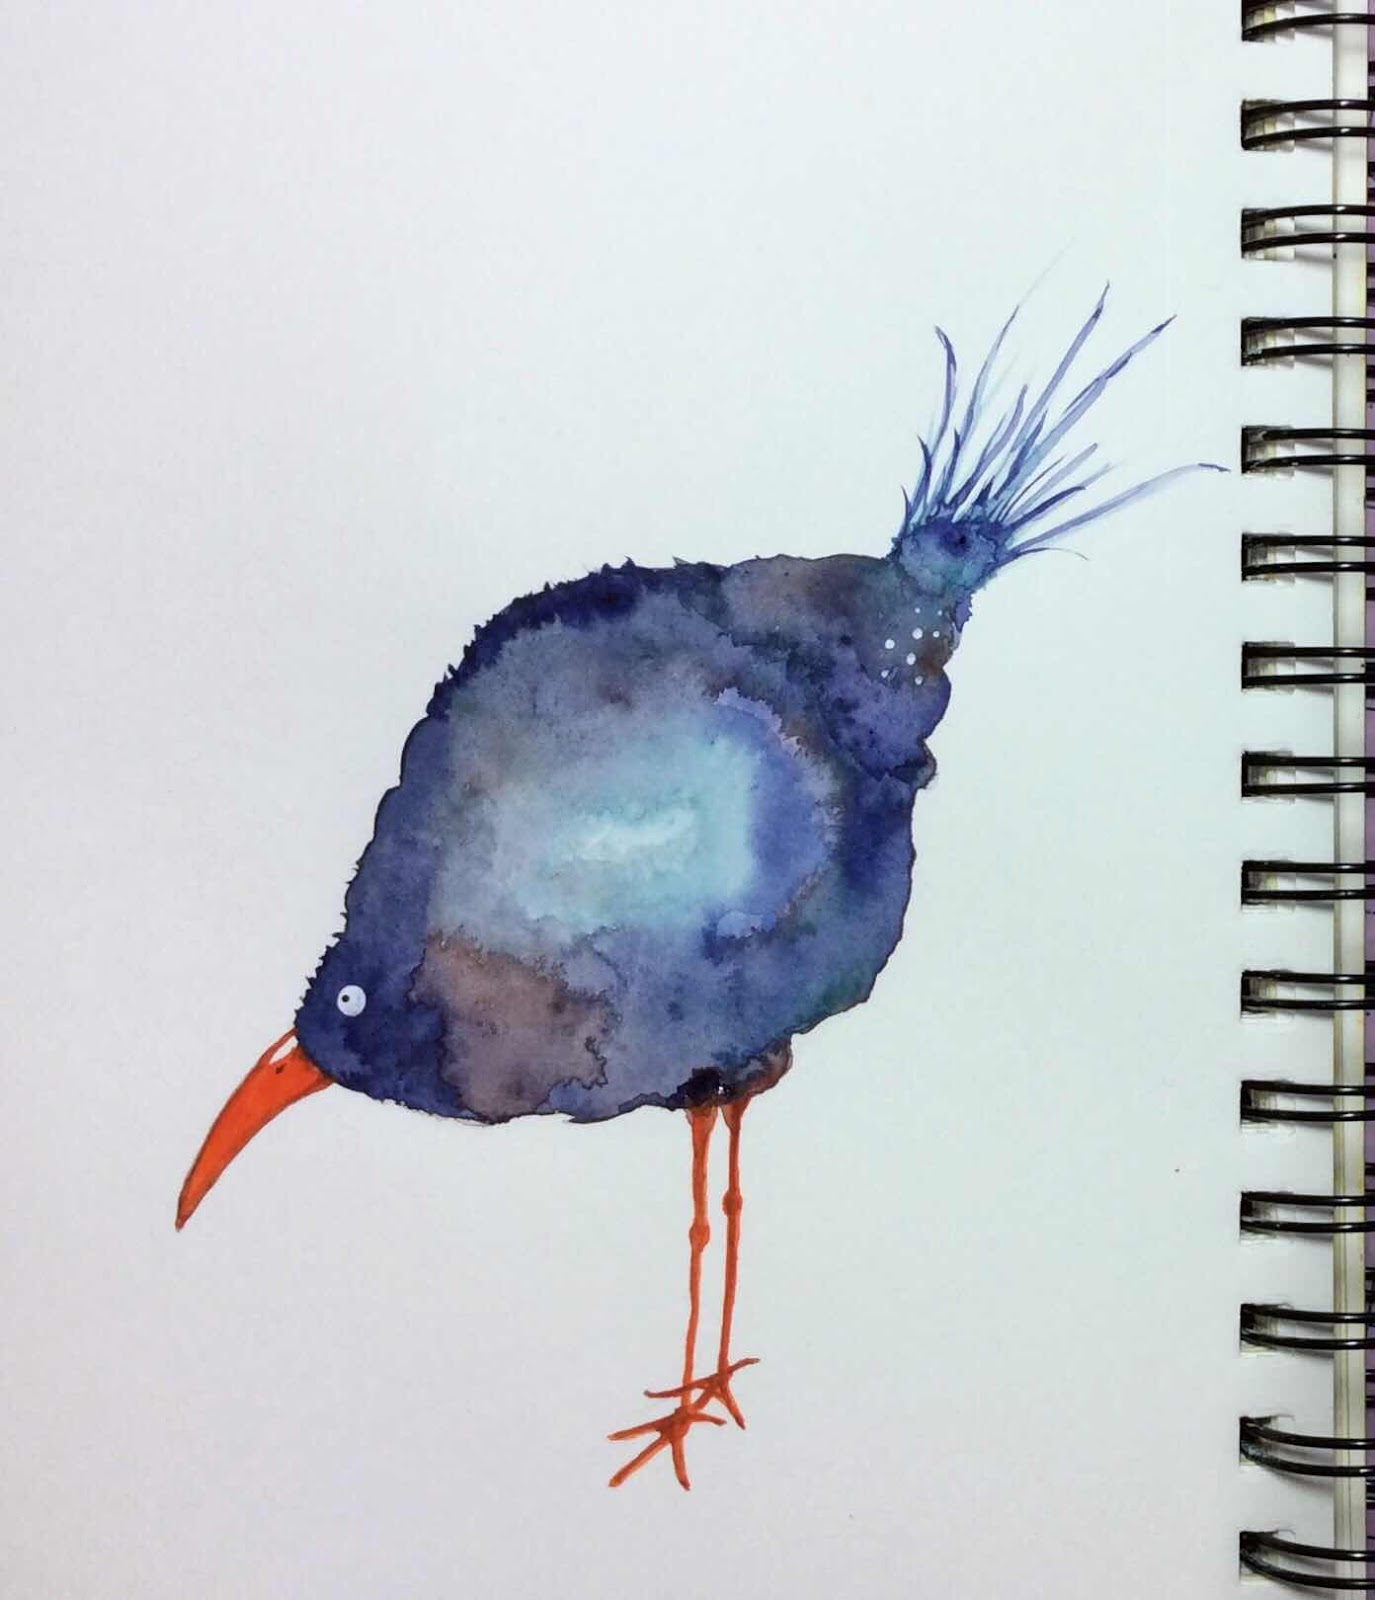
I left him this way for several days not knowing what to do with him until I was inspired to give him some ground to stand on.  Again I’m surprised to be pleased with this painting.  There is a strip of Washi tape at the top of the painted ground.


But my journal page remains like this as I don’t know what else to do for his background.
But I loved trying to paint him and wanted to do another.  This next one is a postcard size.  I added a defined wing with a portion of a flourish rubber stamp.


Still fun, so another postcard size.  I’ll decide what to add for greeting when I decide where he goes.


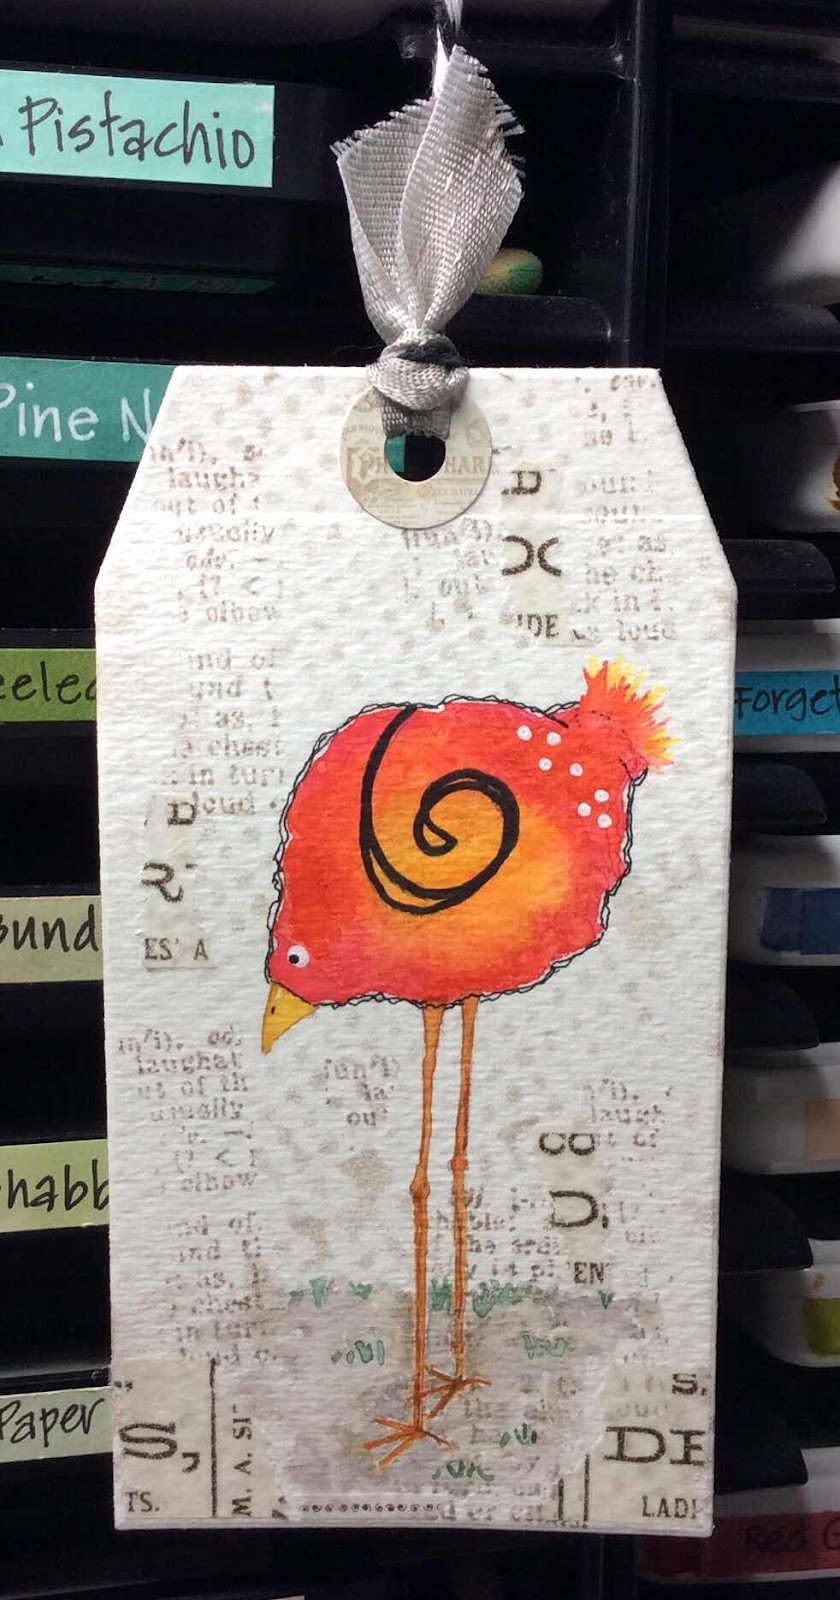
And then I thought I wanted a tag size bird.  With very long legs.  And I drew his wing.  That was brave of me!  This tag bird’s body was painted with Neocolor II crayons.  I found a YouTube tutorial on how to use the crayons like watercolors.


I outlined these smaller birds as they felt like they needed it.  After I do that I question whether they need it or not.  I still don’t know.

I used some gold watercolor paint to give their wings a bit of glitz.


I have had the best time painting abstract birds.  

Tweet, Tweet!

Monday, May 10, 2021

Language Art Journal Page

The theme this month at Art Journal Journey is LANGUAGE.

As I played around with this page, I thought about people who talk in circles.


I stamped a large stamp on a mixed media paper.  Aligned my circle dies over the writing, taped them with Washi tape so they wouldn’t move,


then ran them through my die cutting machine 


To get a variety of circle sizes.


I glued the circles to my page using a spray glue.  When the glue was dry, I wet the circles with water as well as parts of the page outside the circles.  Then added watercolors sloppily around the circles in light and dark tones.


When the paint was dry I stamped writing in the two largest circles with black Archival ink.


Using a circles stencil I drew circles around the outsides of the paper circles with a black Zig Writer marker then added scribbles over the drawn circles.


Lastly I scraped modeling paste through different stencils on the page outside of the circles.


I thought the modeling paste would take up some of the watercolor but it didn’t.  That was a surprise but I liked that it remained white.


Of course I kept thinking what should yet be added.  I liked the page as is so I decided not to ruin it with overkill like I usually do.  It is so hard for me to learn to STOP!


I didn’t intend it, but I now see the scribbles as noise vibration (that could be heard along the telephone lines way back when) of those who can be so good at talking in circles.

Yakety yak!

Sunday, May 2, 2021

Lady Butterfly Tag

The theme is still Anything Goes at Tag Tuesday

I was inspired by Sandra’s Tag to pull out a couple of face stamps to try her background technique.  Which for me, eliminates the need to paint the image.  I am pretty pleased with the front of this tag.


Both stamps are by Stampington & Company

On the back.  I failed at choosing colors for the backside as well as bad placement for the face (which I tried to correct with Gesso).  This entire tag was a learning experience anyway, so I kept it.


I used my Neocolor II crayons.  I scribbled across the tag with the crayon then wet my fingertip and rubbed it over the colors.  I did the same technique with the seam binding.


I wanted to tone down the colors around the images so I brushed some Gesso around the image with kind of a dry brush technique.  I hoped the Gesso would take up the color underneath.  I stamped some IndigoBlu images around the outside edges.  To finish I tinted the edges with Walnut Stain Distress Ink and Black Archival Ink.


April 2021 is already over!  It was another month full of fun and art.


I’m hoping May will be full of the same.

Sunday, April 25, 2021

Lester Kind Tag

I’m joining a new-to-me blog challenge today at Tag Tuesday
I love making tags and I hang them around the house swapping them out during the year.  I’m also trying to make greeting “tags” for gifts rather than a traditional greeting card.

This tag started with a test paper used for creating my most recent art journal page.  Not much of the test paper is even visible anymore.  It just happens that way sometimes.

In my paper stash I found a sheet of vintage photos that came in a magazine.  Somerset Studio, I think is the one that includes papers.  This is where I found Lester Kind.  He does look like a kind gentleman, does he.  I’ve never heard that he’s ever whacked anyone with his cane.  And everyone knows how much he loves butterflies.


I pulled out bits and bobs from my rejects box to glue on the tag.  I stitched the photo to the portion of the ticket that I tore away from the numbers.  I added some bits of Washi tape and stitched around the outside of the tag.  The butterfly had been die cut from a light blue/purple paper (little wonder it was in the reject box) so I sprayed it with a couple of Distress Spray Stain colors.  Over the butterflies’ existing body I glued a die cut clock hand.  


The backside of the tag was also cut from the test paper.  I added pieces of Washi tape.  Over both sides I did a light brushing of Gesso here and there and everywhere.  I inked some seam binding with a Distress ink and attached it along with a hang string.


Tag Tuesday posts a new theme every two weeks.  The current theme is Anything Goes and runs for another week.  If you like making tags, come join in the challenge.

Saturday, April 24, 2021

Twinchies Art Journal Page

Twinchies are a 2” piece of art.


Strange as it may sound, for this art journal page I was inspired by my own long ago art.  As well as being inspired by Sheila of Orange esmeralda convincing me to give art journaling a try through Art Journal Journey  monthly challenges.

The story behind this page is...
A flickr group had a Twinchie swap.  I’d never made twinchies before but they sounded fun.  And they were.  We were given a partner and were to make 4 twinchies to send to our partner.  I made these Twinchies.


There are times when my art surprises the heck out of me!  These were like that.  I couldn’t believe I made them.  I loved them.  I proudly mailed them off to my partner.  We’ll skip a description of what I received in return.  But I wanted my twinchies back.

I always wanted to make more.  But, what would I do with them anyway.  So I never did.  Now that I understand art journaling as the desire to simply make art, I wanted to recreate the twinchies.

I pulled out my stash of previously watercolored papers to choose the 2” backgrounds.


Got out my box of rejected doodads.


Will need some bling.


Made some new doodads.


And began embossing base images with white embossing powder and then adding bits from there to create six twinchies.  Four were recreated  similar to the original four and two new ones.


I’m so glad I did this.  I loved making them again.

The page is sprayed with Old Paper Oxide Spray.  Then Brushed Cordoroy Oxide ink dabbed through a stencil.


Then some modeling paste scraped over another stencil.  The modeling paste goes on white.  As it dries, it will absorb the colors of water based inks.


I forced myself to be patient allowing each application of the paste to dry before adding more to each area.  It’s a nice payoff for sure.  I’m usually trying to get it all done at once and always end up smearing the previously applied wet paste.


I arranged the twinchies on the page.


Added some Washi Tape pieces to the page edges.


Finally I added the words after darkening them with StazOn ink.


Now I feel like I’ve got my twinchies back to enjoy whenever I want.


Have a fun filled artful day!

Wednesday, April 21, 2021

Cookie Tray Mats


Thanks to Carla for all her hard work for this In the Kitchen blog hop!


Cookie jars are not my thing.  Out of sight, out of everyone’s mind and the cookies go stale and look unappetizing in other ways too.  I have this glass domed tray for treats.  The tray is not food safe so the treats always sit on a plate. My salad plates fit perfectly.


I’ve searched for fun plates to use in it, but they are either too small or too large or I just don’t like them.  But the tray is always on the bistro table in my kitchen and it looks blah when there are no treats inside.

It finally dawned on me that I could sew round mats to set inside.  I thought this was an excellent time to try a paper pieced New York Beauty block.  I shrunk the block pattern to a size I hoped would fit.  At the time, St. Patrick’s Day was approaching so I chose some green fabrics to use.


I’m still trying to use up this near white glow-in-the-dark piece I’ve had.


I stitched up the first quarter block.  The whole circle needs to be about 9”.  That makes those center circles pretty small.  After sewing these first small quarter circles, I knew I did NOT want to sew those 3 more times!  So I took the circles off.


And cheated by cutting full circles with my circle rulers.


Loads less stressing!


I kept the papers on to keep the edges from stretching out of shape.


I did the same with the center circle.  


I pinned the binding on from the paper side and stitched it from the paper side also.  That way I would know exactly where the points were and not chop them off with the binding.  It worked out nicely.
I never do a bias binding.  Even on circles.  I always do a straight grain binding.


After stitching the binding on, I pulled the papers off and did the quilting.
Then trimmed around the mat and hand stitched the binding to the back.


It all worked out really well.  AND, it fit in the tray perfectly!  Color me happy!


I had such fun with this one, I wanted to do it again.
This time for the patriotic holidays.
The only thing I changed was that I stitched the centers as raw edge appliqué rather then turning the edges under.  I really like the look of raw edge applique’.


Then Easter was coming too...
These circles were all cut with my circle rulers.


Then when there isn’t a holiday, I wanted an everyday mat to see.
Striped bindings is specifically why I don’t do bias bindings.  I don’t care for the stripes being at an angel on a round mat.


There might be Fall and Christmas mats to come.
It all depends on what shiny project draws my attention most at the time.  


My tray doesn’t seem so empty and lacking even without something edible inside.


You know I had to try the NYB as a postcard!
And, yes, I will mail it to one of my followers.  Just add mention in your comment that you’d like to find it in your mailbox.  I will contact the winner for mailing info.


Check out the other blog hop participant’s projects on this final day of the hop.