Tuesday, November 23, 2021

Cards and Calendars

The Fall colors are pure joy to craft and create with.


These leaves are die cuts using Sizzix Thinlit Die set, Leaf Fragments, by Tim Holtz.

I started with a scrapbook paper that was mostly yellow for the orange leaves and a green for the green leaves.  I used the dipping method to add more color to the paper using stamp pads and spritzing with water.


After cutting the leaves, I embossed them to give them veins.  I then used Distress Crayons to give them more color and depth.


I then used the leaves to make cards.


With two different sets of leaf dies I made the following card.


For this last card I used Distress Mica Stains on black cardstock.  The Mica Stains create a shiny or glittery appearance.  What fun they are to create with!  They are a limited supply item.  It is my hope that someday they will be reproduced as a regularly available item.


HAPPY THANKSGIVING to everyone!

And to catch up with my calendar journal....


Wednesday, November 3, 2021

Fall Leaf Tag

It’s been a beautiful Fall/Autumn.  Suddenly though, it’s feeling a little more like Winter.  But the calendar says Fall and many trees are still showing off their Fall colors.  I’ve preserved a Fall paper leaf to decorate with.


I made the tag and leaf using preprinted scrapbook paper for a base.  I added visual textures by spraying the papers with Distress Sprays and Oxide Sprays.  I die cut the leaf shape then embossed the veins.


I added more color to the leaf with Distress Inks.


The tag background consists of die cut pieces, washi tapes and very small die cut letters.


As always, the back of the tag is finished as well.  Just in case a breeze flips it over.


This leaf on the back of the tag is one of the new Tim Holtz Thinlit dies and I have added the vein embossing to these leaves as well.


Enjoy the Fall colors and weather.  The snow will fly soon enough.

Thursday, September 23, 2021

Long Tall Skeleton Tag

Another 3D sticker out of the stash ready to help celebrate Fall and Halloween.


I cut 2 pieces of Mixed Media paper 12” X 3.25” for a tag front and a back.  I sprayed both sides with various Distress Spray Stains and Distress Oxide Stains.  I liked the muted colors that the Oxide created.  But when I used transparent texture paste through a bricks stencil the colors brightened in intensity.


I then used a black Stabilo All Pencil to mark between the bricks then went over the pencil marks with a water brush then wiped over it with a wet wipe.  It took a little while but I love how the look turned out.


Using a piece of brown scrapbook paper, I sprayed it with three brown Distress Spray Stains.  I die cut branches from the paper.  The variations of the brown colors is not very noticeable after the branches are cut out.


Next it was time to add the long tall 3D skeleton sticker.  I had a few other leftover 3D stickers that I added to the scene.


I die cut his hat using a snowman hat die.


The tag front and back.

The spider web is a die cut and the bats are stickers.


I’ve never made such a long tag before.  It was a fun experience.

I’m a little behind in sharing my calendar journal.  This was August 2021.


Wednesday, August 18, 2021

4 Inches of Art Space

I have watched some art play by others in a space of 4 inches.

I wanted to give it a try.


I found only one place to obtain materials/supplies for this size journal.  That is at Joggles.com.  It’s a great journal system.  The pages and disc binding can be purchased together or separate.  There are paper choices and sizes of mixed media white and black and watercolor paper.  What I love most about it is that I can work on a page outside of the journal then add it in so easily.  Or even remove a page so easily.


My first page was successful and that was so encouraging to keep going.  The background is Distress Inks and Oxide Inks.  Black Distress Spray Stain sprayed through a stencil and modeling paste pressed through a stencil.  The butterfly is punched adding a key hole and brad body.  A small talk sticker completes the page.


(The next two pages were not so loved, so they are languishing in a drawer.)

But these next keeper pages turned out okay.  Such sweet Tim Holtz paper dolls children.


Then I had some ideas that are even more to my liking in style.  I’d gotten some new background stamps.  
The flower is a die cut painted with various colors of Distress Inks.  The man was stamped on tracing paper then cut out and glued to the background.  Ephemera pieces glued to his coat.


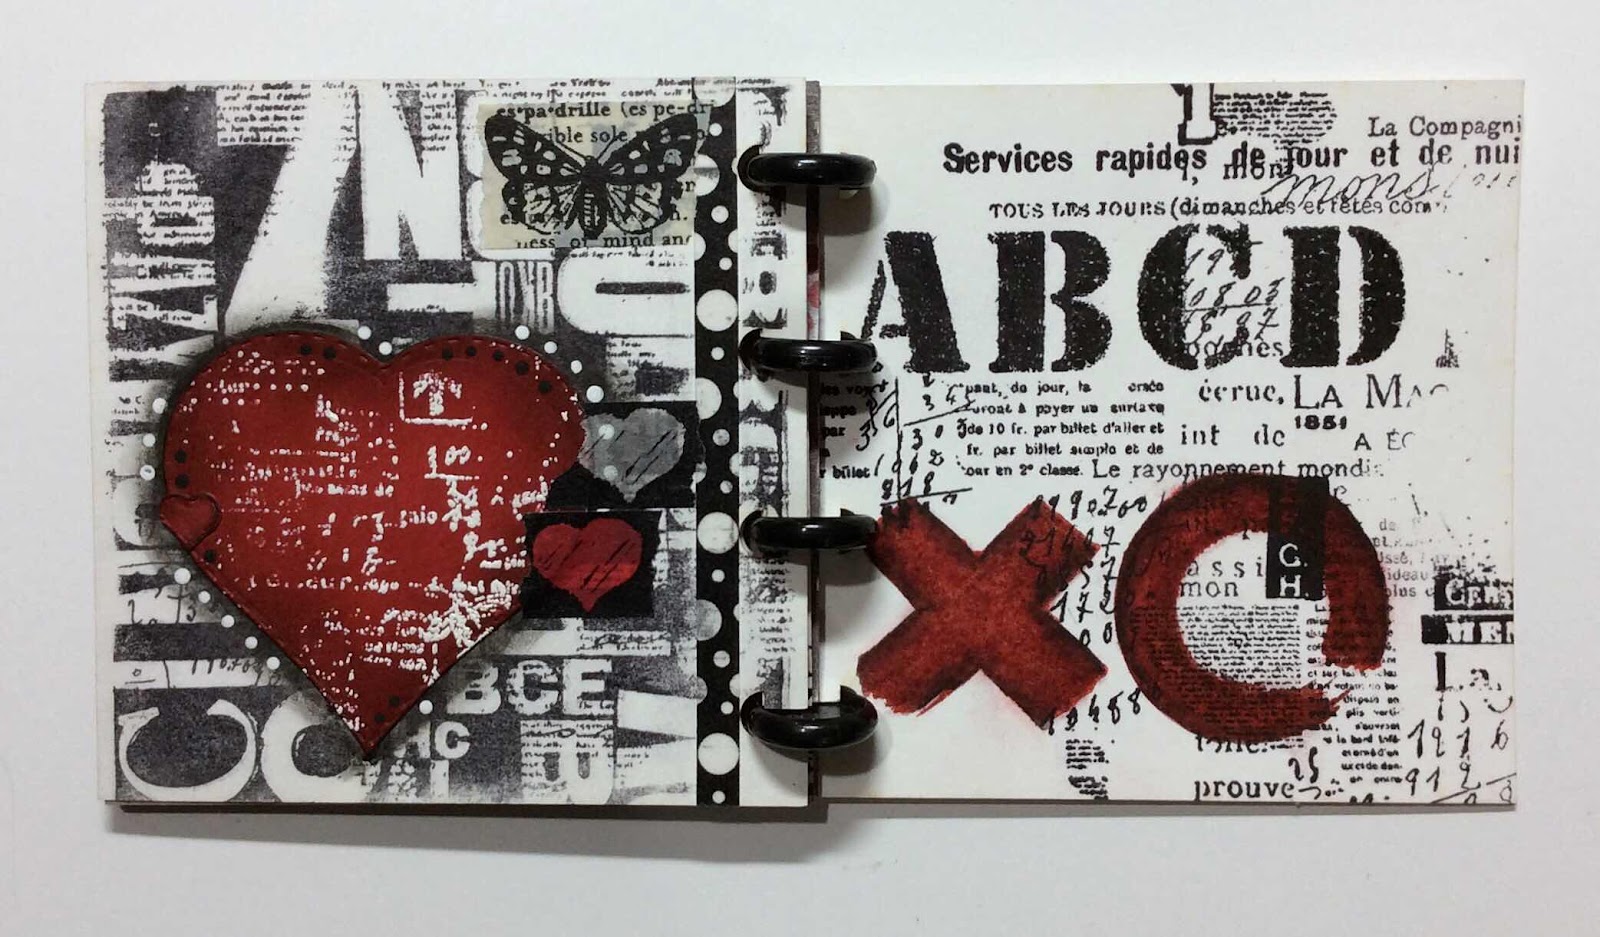
I love me some black and white and red.  The heart is die cut then stamped and embossed in white.  I added a Washi dots strip, Washi butterfly and Washi hearts.  White dots made with a Posca pen, black dots made with black acrylic ink and shading with the black Stabilo All pencil.
The facing page is all stamping with some shading with the black Stabilo All pencil.


I’m hooked.  It’s been quite fun playing with this size art page.  And the ease of use of this journal system is a dream.  The pages snap in and out so easily.  The mixed media paper is a good quality.  I definitely can recommend this system.  The discs come in a variety of sizes.  My journal is starting out with the smallest discs but can so easily grow and the discs can be changed to accommodate a growing number of art pages.


I’ve been surprised at the amount of art that can fit in a 4” space.  I’m not sure personally that I’d want to go any smaller.  This is a nice, fun size to work within.

I’m linking my little journal project to:
 Creative Artiste Mixed Media Anything Goes

Friday, August 13, 2021

Cute Ghosts Tag

On the challenge blog, Tag Tuesday , the challenge for this fortnight is to use the color combination of orange and blue.  I like this color combo.  I didn’t plan to go in the direction of Halloween, but that’s the direction it went in anyway.


I did the smooshing technique where you smear some ink from your ink pad on a non-stick surface, spritz it with water then drag or tap the tag into the inks.  Drying between drags and taps so that the colors layer.  I used these ink pad colors.  I then stamped the web with Pumice Stone Oxide.


I stamped the tree limb with Walnut Stain Oxide going over that color with Black Soot Oxide for a deep brown color result.


I then stamped stars with Chipped Sapphire Oxide as well as inking along the outside edges of the tag.


The word letters are die cut from blue card stock.


When the two tag sides were finished I glued them together back to back.  I like a sturdy tag finish.

I inked a length of white seam binding in Chipped Sapphire Oxide ink on half the length and Orange Marmalade Oxide ink on the other half.


I used posca pens to make white dots throughout the background.

This tag was specifically created to use a couple of 3D ghost stickers that have been in my stash for a several years.  As well as some bat stickers and of course Washi Tape.


I put a ghost on each side of the tag.


Because my tag went in the direction of Halloween, I kind of struggled with using blue ink instead of a brown or black.  But I like that this challenge took me a bit away from the standard.  I’m happy to have these guys out of storage and ready for October.

Tuesday, August 10, 2021

Little Things Art Journal Page

It’s the little things that make life big.


The theme this month at Art Journal Journey is TYPE.
The 3D embossing folder I used to emboss the cardstock is type letters from the good ole days.
A 3D embossing folder works very similar to regular folders but it makes a deeper impression.  Very cool.  
(See Tera, I paid attention when you explained.)


I then began to add color to the paper.  First by inking one side of the inside of the folder with Distress Ink Tumbled Glass.  I spritzed the paper lightly with water then inserted it into the folder and ran it through the BigShot.  The ink transferred to the paper.  I repeated that process to get more ink on the paper.  With a blending tool I rubbed on Distress Antique Linen over the letters and some on the background.  I also blended some Distress Oxide Cracked Pistachio on the background.  I highlighted the letters again with Distress Ink black soot.


I then used an Stabillo All pencil and a water brush and my finger to add the blacker spots and make drips and darken the outside edges.  When I was ready to add this to a page in my journal, I thought I wanted a checkered border around the page.  That looked waaayy too busy.  So I painted over the checks with heavy body white acrylic paint a couple of coats or so.

I used Washi tapes on the outside of the book page.  That added to making the checkered board more subtle in the background.


Then I glued the embossed paper to the page.


And added the Tim Holtz paper doll girls, shading around them with a graphite pencil.


  At the top of the page I added the typed small talk sticker sentiment.


Definitely got my grunge on for this page.

Linking to Creative Artiste Mixed Media Challenge Anything Goes
Linking to More Mixed Media Challenge Anything Goes