Tuesday, October 11, 2011

A Little Weekend Jaunt

Along the Pacific Ocean coast.  It's so nice to know the ocean was right where we'd left it some 20 odd years ago.
And just as beautiful, too!
We couldn't have asked for a more beautiful October day.
These photos are taken in Monterey, California.

Toto, I don't think we're in Wisconsin anymore... (although I've heard it's been pretty nice in Wisconsin for October!)

Friday, October 7, 2011

Throw Quilt #4

This is only my 4th "large" quilt.  45" X 76"  It's just a simple whole cloth that I added borders to.

It's Dad's Christmas present.  He always likes the whole cloth backs of my quilts better than the pieced fronts.  I'm not sure how to take that.  In any case, this old house is cold and he's elderly and he uses quilts a lot!  He's worn out the ones my mother has made for him.


A length of fabric isn't wide enough so I add borders on the front and back.  You know, those borders are NOT the easiest thing to line up when you sandwich the layers!...and they HAVE to be lined up.  I do my own quilting with my Bernina 1230...it only has a 7" throat...not the easiest thing to do, but the most affordable, so it's straight line quilted in one continuous line.  Meaning I didn't sew from edge to edge and cut threads.  I stitched a continuous line from side to side from one end to the other in only the quilt center section.  That meant that when I was close to either end the entire quilt had to be inside the machine throat...yep, I'll be trying to avoid that situation in the future!

do

I haven't decided whether I made the right choice for the binding or not.  A solid might have looked better.  I hardly ever think to consider solids...there are SO many prints and I love them all so!  Dad is going to say it has clown stuff all around it...I'll just betcha he does.

And then there's that perfectionist illness I am afflicted with.  I couldn't just piece my bindings end to end.....those stripes HAD to match!


When you line those up 6 or so times, it gets easier as you go along.  I think I done good...only ripped out one for a redo.

So, one name crossed off the Christmas list as done...YES!

The quilt top fabric is Williamsburg Fok Art Village by Windham Fabrics Pattern No.31910 (according to the selvage).

Thanks for stopping by,
Annie


Tuesday, October 4, 2011

Tutorial: Fun Stripe Border

I have been having the best fun with this stripe border.


And I want to show you how I make it.
You guessed it...paper piecing!


I just cannot get anything like this straight or uniform in size by cutting the pieces and sewing them together.  Paper piecing comes to mind as a solution for the simple fact that paper will not stretch.
If you've had trouble with my ice cream cone tutorial, this one may just clear up some of your confusion, as this is the exact same technique and process but on a very basic level.

I know this is a lengthy tutorial, but I don't plan on any more paper piecing tuts. If you can't figure it out now, then you must pay my travel expenses to come to you for hands on personal training. LOL


These next photos just continue to walk with you through the continued process.  After the first block of white, I work with the entire fabric strip to cut waste and not worry about whether my fabric piece is long enough to work with.


When your strip is complete, you can trim the long edges to have a 1/4" seam allowance ready to sew to your project. 

Have fun and I want to see your borders,
Annie

Thursday, September 29, 2011

Crème Glacée

The one and only, Madame Samm, designed this oh-so-me blog.  She designed it, she organized it and then she spent the time to teach me how to use it.  I just love what she came up with and I'm mystified that she saw me so clearly!

In return she asked for ice cream.


I don't blog so good yet, but I definitely can do ice cream!

Originally I designed this cone pattern for a table mat for my daughter for her birthday and it eventually evolved into this end result.


I don't really enjoy mass production or even duplication when a creation is intended for a specific reason.  So, I really needed Samm's ice cream to be different.  Immediately I was in a rough patch to come up with a different design.  It didn't really work, I still only liked the same color cones, hard as I tried to change them, and I still only liked the same center arrangement.

Then I got stuck again for a border.  This I had to muse on for a couple of weeks before I finally thought about my recent thin paper pieced stripe design.  I think it will work...


I moved on to the quilting letting the cones dictate where the quilting went.

I'm pretty pleased with this new Crème Glacée table mat.  French is Samm's first language so I thought a french title was fitting for her.  Not to mention that the words ice cream in french just look as delicious as the cones don't you agree?


When I added the little cone dot just inside the binding, I didn't cut the fabric thinking about where the dots would fall.  They show only in sections...I immediately thought I have to take those off and fussy cut the dotted strips...then I took another look...I think it adds visual interest the way it is.  so, it stays put.


Gosh darn it!  Another little quiltie that was so hard to let drop into that big blue postal box.  I hope you like it too Samm.

Enjoy a lovely end of summer ice cream social!
Annie

Tuesday, September 27, 2011

It's time to sew for Halloween!

How frightfully fun is that?!

It's the time of year where we can just let our imagination and creativity run wild with some fun creations.  Some come out seriously beautiful and others come out quirky and whimsical and sometimes just plain silly.


Back in the day...I didn't much use my imagination.  I looked for books and patterns to use.  And I pretty much had to like the whole thing at the prices of patterns and books.  Now I use at least some imagination...for instance, this spooky pumpkin patch comes from several sources.  The woven background is from a book, the pumpkin is from an applique pattern, the twisted pumpkin vine and quilt label came from my imagination, the crows came from a rubber stamp.

So I'm looking at books and patterns completely different now than I did "back in the day".  I see bits and pieces of ideas rather than the whole of what is presented.  And, as you can see, those bits and pieces come from everywhere!


It's Halloween Mug Rug Swap time on Flickr!
My favorite swap time.

We are assigned secret partners who give us an indication of what types of things they like and dislike and we then create from there.  I've been pretty lucky with partners for one of the rules is that the mug rug has to be fashioned to their likes.  This is the one rule that I don't get along very well with because if I want to receive in a swap something that I'd make for myself, well then, why don't I just make it myself?  In a swap I want to receive something that my partner wants to make and I want it to tell me something about that person and their creative soul.  (Well don't I just feel better about airing that in public)  In any case, we then get to post sneak peeks as we create...


Carol says "no sneak peeks!" that that's just for the doll quilt swap.  Ok, so maybe we could call them progress peeks.  Either way, if you go check out the Scrappy Mug Rug Swap you'll see that Carol has been out-voted in favor of sneak peeks.  Sorry Carol.  They're just too fun not to do them.  My partner's mug rug is finished now and waiting to be mailed.


We can include bits of goodies if we so desire...like candy, fabric pieces, stickers, whatever we find that we might like to send.  Only the mug rug is mandatory but extra little goodies are just fun to include.  It seems to have become my signature thing to include a fabric postcard.  And...

It's Halloween fabric postcard swap time on Flickr too!

Check out this Fabric Postcard Swap.  Although it's too late to join in for Halloween and Fall, you could be getting ready for Christmas...I would think there will be another round for the holidays.   


So I have two postcards ready to send.  I can't say who gets which yet.  And, I just might make one or two more before it's time to send them...just to keep my partner wondering what she'll get...since the postcard swap is not a secret partner swap at this point.


For myself, I'm enjoying my Halloween quilt that I made last year.


Those gorgeous pumpkins were made for me by a wonderful friend.


Have a frightfully good fun time preparing for the onslaught of ghouls that are sure to come soon!

Annie

Monday, September 26, 2011

I'm back from my little run-about...

...and busy trying to catch up with all of you and what you've been up to while I was playing biker chic.


Thursday, September 22, 2011

Off For 3 Days of Irresponsible Fun!

Destination:
Street Vibrations
Reno, Nevada


I have a list of quilt shops in and near Reno!  Now how to get my ride to take me to one or two of them...

Have a great weekend everyone!  See you on the flip side.
Annie

Monday, September 19, 2011

Fabric Postcard and Binding Tutorial

This tutorial has been updated and can be found here:

I've had several requests to explain how I bind my fabric postcards.  So I'm finally getting around to posting a tutorial of my process.


You really aren't going to believe how simple this is!


But first, you need your postcard front design, a layer of stiff sew-in Peltex, a light to medium weight regular fusible interfacing and a backing to write your message on.


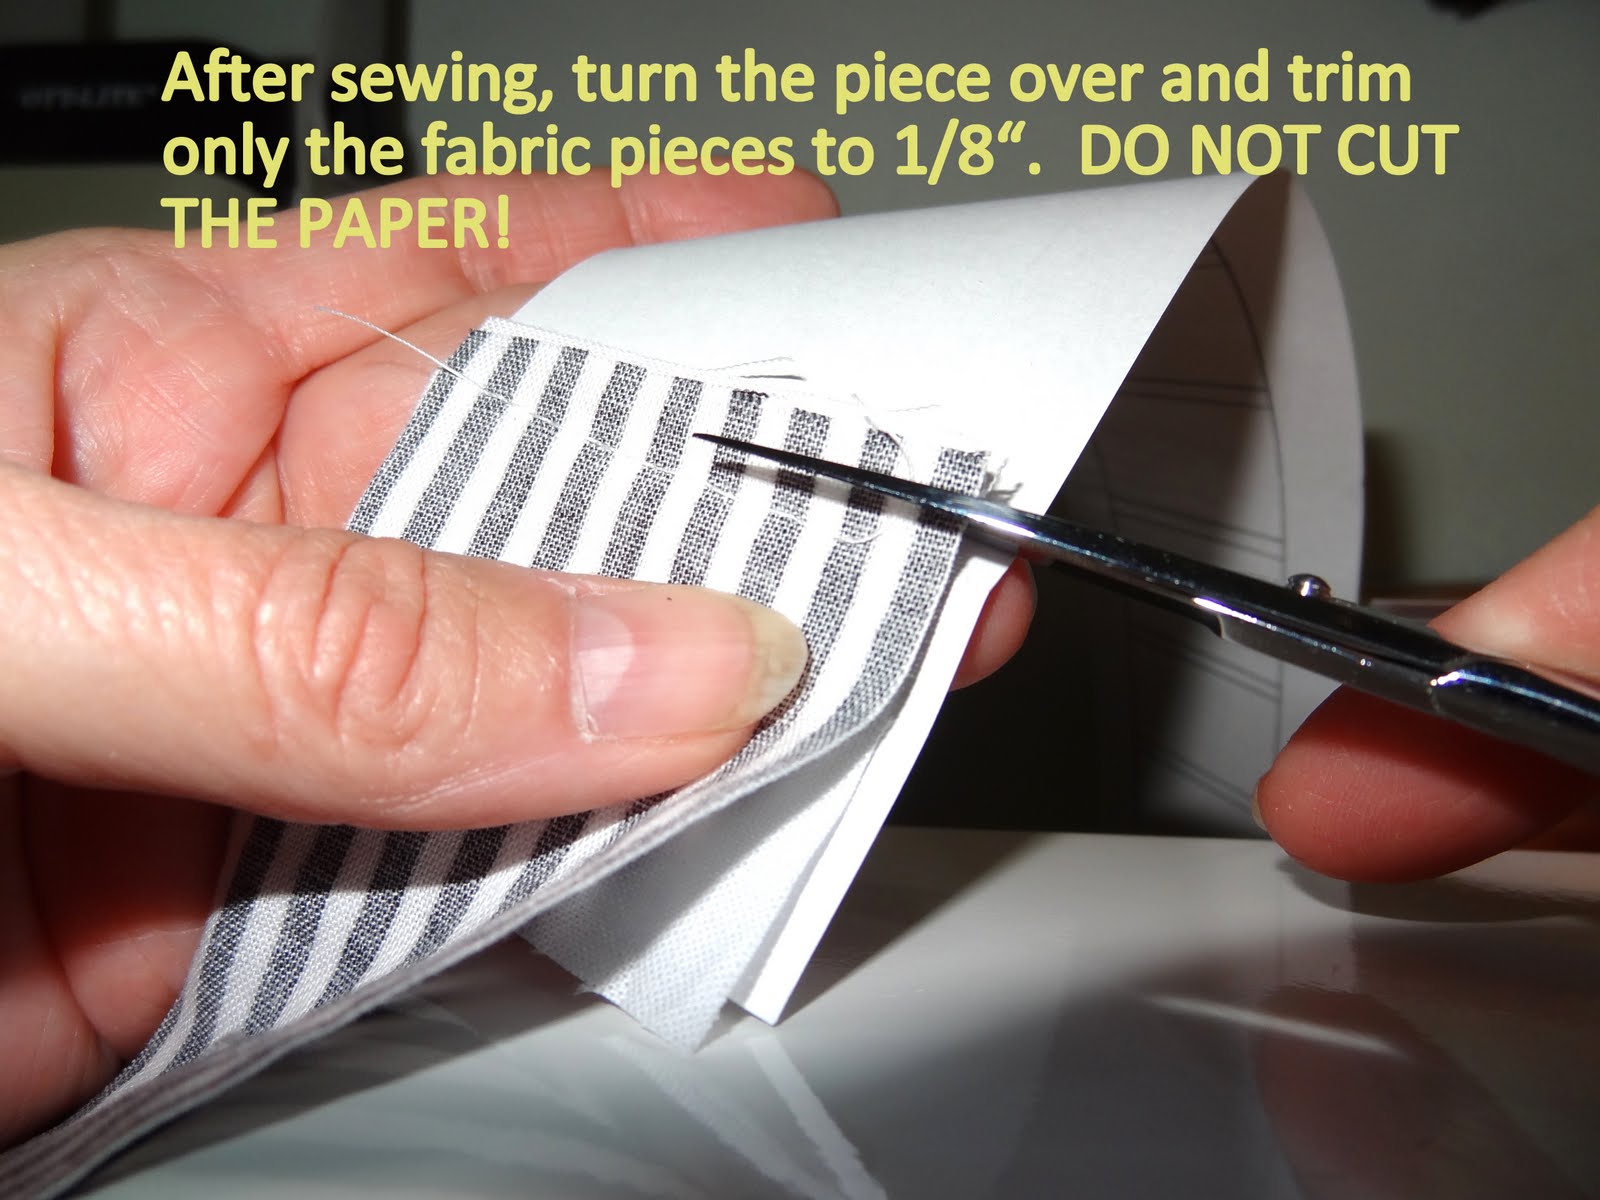
Step 1:  Create your postcard front design  This ice cream cone is paper pieced.  When I raw edge applique a design, I use Wonder Under for fusing the pieces together.  Lay your design on the Peltex.  Pressing them together helps keep the layers together while you top stitch on your design through the Peltex.


Now do ALL your stitching before you add the backing.

I use a paper backing because I really do mail my postcards and I like that it's easier to write on paper.  I also like the security of knowing the stamp will remain on the postcard.  However, you certainly can use fabric as your backing.
 
I use Post Card rubber stamps on my backings.  You can  also just use a marker and write "Post Card" or print the words on your printer. The backing can even be left blank. It's totally a personal preference.  Then I fuse the wrong side of the paper with a piece of interfacing.  This insures that your paper backing will not fall off after satin stitching the binding.  (The sewing perforates the paper)


Now lightly glue stick around the outside edges of your backing just enough to stick it to your completed card top., wrong sides together.  Edge stitch close to the edge just to keep the layers together while you add the binding.  (You don’t see that in the photo because I didn’t use to do that.  But have since learned it is very helpful to keep your design from bubbling while gluing the binding on.)

Choose your binding fabric and cut a 3/4" strip long enough for all four sides of your card.  Press this strip in half lengthwise.


 I usually cut the short lengths first, then the longer lengths after the short lengths are attached.


With a glue stick, run glue along the edge of the paper side or back side of the card.  Be careful not to get the glue out farther than the binding will cover.  It's just to hold the binding in place until it is sewn down.


Place the glued paper side down on one half of the binding.  Repeat for the other short side.


On the front of your card, run glue along the edge being careful not to extend the glue farther than the binding will cover.  Fold over the binding to the front and press it into the glue.


Cut binding lengths for the long edges and repeat the glue process first gluing to the back and then to the front.


When all the edges have binding glued on, just run the iron over both sides lightly to melt any little glue globs that might have happened.  I know you're thinking this is going to gum up your needle...nope!...your needle will not have a clue that it was anywhere near glue.

Now we're ready to stitch that binding down permanent.  With a straight stitch, back tack to just off the edge.  Then stitch forward just to the inside edge of the binding. 

t

Change your stitch to a zigzag.  You'll have to find the best satin stitch length for your machine.  I set my machine for a width of 3 and just a smidge longer than my preset satin stitch.

This now is the reason to fuse interfacing to the back of the paper backing.  The satin stitch will perforate the paper.  The interfacing assures you that your backing will still remain connected to the card.


Satin stitch all the way across to where the binding meets again.  Straight stitch to the edge, back tack to the satin stitch, turn your card, repeating the stitching for the first three sides.

When I get to the last edge, I pull my starting thread tails across the binding so that they will get stitched into the satin stitching.


When I get to the end, I sew several tiny straight stitches along the inside of the satin stitching to finish the sewing.


Keep the raw edges at the corners from fraying by adding a tiny bit of fray check along the edge.  Not too much, mind you.


If the satin stitched binding edges leave little frays sticking out, trim them close.


WhaLa...all done!


You can view all my fabric postcards displayed as a set in my Flickr photostream here 

Lots of people like to just satin stitch the raw edges of their layers together.  I like the way the binding and contrasting satin stitch frame the little art work within.  I'll be happy to answer any questions you may still have.

Good mail day to you,
Annie