Sunday, May 14, 2017

Playing with Color Burst

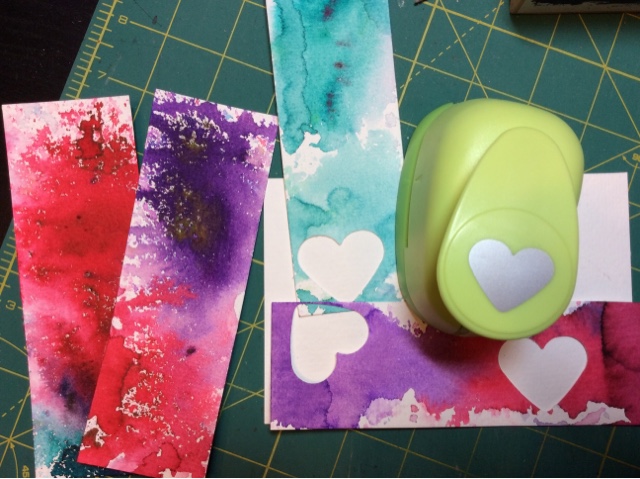
I received a set of Color Burst watercolor powders by Ken Oliver for my birthday.  My first play with them was a really dark ugly mess.  So far they've been really hard for me to control the powder.


This time around didn't start out much better either.  I would get either too little powder or way too much powder on the paper.  I tried squeezing small puffs of powder and tried shaking.  My daughter now tells me to tap.  So next time I will tap.  


I punched hearts from the better pieces,


stamped some words on them, inked the edges then stitched them to my card base.  Then added a tiny puffy heart sticker to each heart. 
The stitches on the left are a rubber stamp.  I love this stamp set that includes a variety of stitches.


I used two different sentiment stamps on the inside of the card.


My parents will be married 68 years come June 5th. 

Friday, May 5, 2017

April 2017 Calendar Journal

Here is how April went along for me.  It's my birthday month...a day way at the end.  Which makes it more fun to celebrate starting at the beginning.  Starting with turning the plain calendar page itself into a birthday party.


I wonder what May has in store for me.  Fun I hope...
"Girls Just Wanna Have Fun"!

Tuesday, April 4, 2017

The Jell-O Box Project

My Jell-O box project is now my Distress Ink pads storage! 


It's on the crude side, but it's light-weight, and it serves the purpose.  Wood and plastic ones I viewed took up a lot of space, are thick and are quite expensive.  And maybe when I might want to add on, the same design might not be available.

I made these storage towers like this:  Collect jell-o boxes.  I did not mind eating all this jell-o.  Brand name JELL-O and Walmart brand gelatin boxes are not quite the same exact size, but they are pretty close.  I really needed to eat a variety of jell-o not just two flavors.


Open the boxes at the glued side.


Cut off the flaps on one side.


Then glue the ends back together.  Clamp them til the glue dries or at least sets.


Then glue them together.  I glued them as sets of two, then four, etc.


Clamping them until the glue dries or sets.


I use some Washi style tape to clamp the back ends.  I have several rolls of "why did I buy this tape". 


My towers are 10 boxes high.  I don't bother removing the tape as it won't interrupt anything.


I then cut pieces of mat board to make each tower sturdy.  It really is quite sturdy.


My ultimate plan is to set them all together side by side and cover them with some fun scrapbook papers.  However, me and them are not in our permanent space at this time, so I'll use them for now in a configuration that space allows for.  I'm just thrilled my ink pads are separated and easily pulled out for use.  And the great jell-o box size allows me to keep each make-up foam with the pad color.


I'm happy.  Imperfections and all.
Happy stamping and inking!

Sunday, April 2, 2017

March 2017 Calendar Journal

March was a fun month to document even though much of it wasn't really much fun at all.


I'm happy, as I feel I'm beginning to settle into a bit of fun in finding more artsy ways to make the month look.


It just isn't easy for me to be artsy in such small and many times odd sized spaces.  It's really giving this old brain a work out.  A 12"X12" layout would be easier, but I'm sticking with this 8.5"X11" size.  I'm kind of bull-headed like that.


Happy Day!

Saturday, March 18, 2017

Vintage Gentlemen Postcard

This week at the Sunday Postcard Art challenge blog, the theme is VINTAGE GENTLEMEN.  They are some of my favorite people for art.


I didn't take process photos as there wasn't much plan for this postcard.  These were most of the supplies I used.  He just surprisingly came together.  I kept thinking this card was going to go to the trash along the way, then suddenly it just felt right.  

I used the die to cut the upper left corner of the card then glued it over a dark paper to peek through the holes.  I then stamped my vintage gentlemen.  I put a mask over him and stamped the unreadable words behind him.  I then added washi tapes, trimming them around him.  Finally adding some shading around the image. 


The correspondence side.


Happy Mail Day!