Sunday, October 30, 2011

Ghastlie Blog Hop Week 2

It's the last ghastlie day of the
Ghastlie Blog Hop
I mean that in a fun way because it's been so ghastlie fun!

Final Day Line Up
ON Friday November 4th
Day 10
Ms Susan Ghastlie
Madame Ghastlie


This ghastlie idea of Madame Samm's was a really fun blog hop!  The ghastlies fabric is quite unique allowing our own ghastly minds to come out of the closet and create openly and to show our ghastlie concoctions for all of blogland to see!

Have a ghastlie good day all!
Annie

Thursday, October 27, 2011

Fabric Postcard Swap on Flickr

Last day to get in on the fun!

Sign-ups are now open for
the Fabric Postcard Swap group on Flickr!


Two themes are available to choose from or you can create a card for both themes:
Winter
and/or
Sewing Room Road Sign...
...meaning a road sign that could be found in your sewing space, related to sewing, of course.
Get your creative minds working and come join in the fun!
There are a variety of tutorials on this world wide web to help you...even I have one you can check out here.

We're going back to the swap being secret partners so it's always fun watching sneak peeks and whole cards being posted and making comments and wondering if they are the one that will come in your mailbox.

Sign-ups are open through October 30th
http://www.flickr.com/groups/fabricpostcard/

Wishing everyone a fun mail day!
Annie

Wednesday, October 26, 2011

Ghastlie Blog Hop Winners!

The lucky Ghastlie Blog Hop winner for Tuesday's grand prize is
Cherise
WOW Cherise, congratulations!

And the lucky winner of my Ghastlie mug rug and postcard is
tpott
Congratulations Toni!  Your winnings will be on their merry way to you this week!

Thank you to each and every one of you who visited and is visiting my blog on the blog hop.  I am having loads of trouble with Internet this morning, but you will hear from me personally to thank you for your kind and wonderful comments on my ghastlie projects.  I have almost 300 comments to respond to, I've been through about 100 of them so far.  They are so heartwarming!

Enjoy the remaining blogs with so many project ideas for these ghastlies and any other favorite fabric line you have.

Annie

Rubber Stamping on Fabric


This tutorial was created for Madame Samm's Sew We Quilt blog and I know of no other way to get this tutorial on my own blog other than re-posting it here.  So, please excuse my duplication of this post if you've already seen it.

 
 A Ghastlie Tea Party! 
Oh please, do come in...

The tea cups are paper pieced.  I fussy cut the images and fused them to the background fabric using Wonder Under. 


The images are not appliqued after the paper piecing is done...they were fused to the cup background fabric prior to the paper piecing process.  Positioning them to line up as I wanted them to was rather tricky and my seam ripper was a little busier than I liked.  But, where there's a will there's a way!...not to mention a sheer determination on my part to have my way!  My paper piecing tutorial and that fun stripe border tutorial are listed over there on the right under "Tutorials"
What I'd like to show you today is the rubber stamping on fabric.  This too was sheer determination on my part to come up with a permanent, washable solution for my desire to incorporate my rubber stamping with my sewing/quilting.

These are your supplies needed
Fabric or project you wish to stamp on
Ruler and air soluble pen (optional)
Small ruler that is thicker than standard
StazOn Ink Pad
StazOn Cleaner
Rubber Stamps
If you just plan to stamp an image, you won't need rulers.  The rulers are for stamping words in a straight line.
Draw your lines with a standard ruler and air soluble pen.


Place the small thicker ruler along your drawn line and be sure to hold it in place until your letters for that line are all stamped.  When stamping the letters, keep the wood against the ruler. 


Unless you have an absolutely perfectly spaced set of letter/number stamps, they will most likely look a bit wonky - which is exactly what I like about this process.  Although spacing of the letters takes practice and most likely will be wonkily spaced, at least they will all be lined up along the bottom edge.  
I normally wait until the purple lines disappear before I work with the stamped area with an iron.  Depending on your fabric, the heat from the iron can set your disappearing ink into the fabric which makes it harder to remove but not impossible...yes, I know this from experience.  But, if you're in a hurry to get to working with it, just dip a small paintbrush in water and hurry the disappearing along quickly.  Remember, the StazOn ink is permanent, it dries quickly and is washable so the water will not disturb your stamping...yes, I know this from experience as well.


This particular alphabet set of rubber stamps I found at Michael's in their $1 bins. What a bargain! I like the mix of upper and lower case letters.
There's no limit to what and where you can stamp on your projects.  It's a wonderful alternative to the times you are limited to where an image or words are placed on your project when you have to use an ink jet printer.
I'll be watching for your projects using this technique. 
Happy stamping everyone!
   

Tuesday, October 25, 2011

Ghastlie Inspiration Projects

Welcome to this Ghastlie Blog Hop

Madame Samm one day said, "let's have a Ghastlie Blog Hop" (or something like that), so here we are, doing just that!  How fun!
My project ideas started with this Ghastlie Tea Party


Which is right now currently serving up a tutorial over at Sew We Quilt.  I'm over there giving away all my little secrets for rubber stamping on fabric.  It's quite easy and extremely fun...check it out when you're finished here.  You can find my paper piecing tutorial and this fun border stripe tutorial over there on the right side of my blog listed under Tutorials.

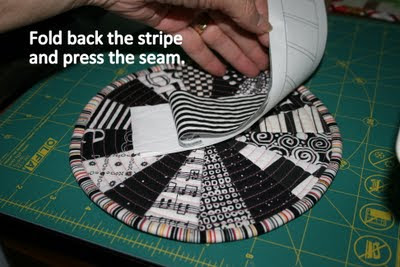
I can't really even take credit for this next project.  In my tutorial  for that fun stripe border I showed how I use one of my mug rugs as an ironing pad while I do small paper pieced projects using my "iron on a stick" for pressing the seams.  Madame Samm honed right in on that!  So this ghastlie ironing pad (larger than a mug rug) is for right next to your sewing machine for those mini pressing jobs...well, soon it will be right next to Samm's machine for her mini pressing jobs.

Next, is a mug rug for your mug and snack.  Somehow I've ended up with an extra mug rug so, when you make comments here today and you mention you'd like to have this mug rug,

you will have a chance to win this ghastlie mug rug...and I doubt that it will travel alone.  In fact, it will travel with this ghastlie postcard of the Ghastlie Knitters.
And here is finally my quite involved Ghastlie project that is still a work in progress.  I've no clue what possessed me to create this tedious applique monster.  Yes, every letter is individually cut and raw edge appliqued to the background.  It had to be done, I'd already decided.  All the while stitching I kept wondering what I was punishing myself for.


Each character was cut from the orange background fabric and fused to that fun thin line black and white fabric and again, raw edge appliqued. 
It's a 36" circle and intended as a table mat.  I suppose it could be placed on the floor as well, but I don't at the moment have a floor that nobody walks on.  This is not the design that I started out with.  That one didn't work out.  So, this one is still evolving...there will yet be some bats and pumpkins for color and maybe another bird, and after that...well, who knows at this point.  I just keep plugging along with it.

The ghastlies are not necessarily a Halloween themed fabric, but that's how they always play out in my mind.  They live amongst us every day, but they really fit in during our Halloween fun.
Now don't forget if you leave a comment here for me, I will draw one name to send over to Madame Samm to enter in today's grand prize drawing on her blog and I'll draw another name as the winner of my Ghastlie mug rug and postcard.

I'd love it if you'd add yourself to my collage of followers at the top of my blog...you'd look so cool up there!

Here is today's ghastlie line up of blogs to hop:

                          Mrs. Annie Ghastlie (You are here) 

Have a ghastlie good time on this Ghastlie Blog Hop!
Thank you so much for visiting today.


Monday, October 24, 2011

Welcome to our Ghastlie Blog HOP

Ghastlie Blog Hop now going on!

Line up of Ghastlie Bloggers
ON Tuesday October 25th
This would be me!  Hey, I'm also a guest blogger this same day over at  Sew We Quilt. 


Each and every single day at the end of each day
there will be a grand prize winner at
Madame Samm's blog.  There will also be giveaway
winners on some of the individual blogs as well.

Saturday, October 22, 2011

Fabric Postcard Swap - Sign Up Now!


Sign-ups are now open for
the Fabric Postcard Swap group on Flickr!


Two themes are available to choose from or you can create a card for both themes:
Winter
and/or
Sewing Room Road Sign...
...meaning a road sign that could be found in your sewing space, related to sewing, of course.
Get your creative minds working and come join in the fun!
There are a variety of tutorials on this world wide web to help you...even I have one you can check out here.

We're going back to the swap being secret partners so it's always fun watching sneak peeks and whole cards being posted and making comments and wondering if they are the one that will come in your mailbox.

Sign-ups are open through October 30th
http://www.flickr.com/groups/fabricpostcard/

Wishing everyone a fun mail day!
Annie

Friday, October 21, 2011

Get Ready!...

The Ghastlie Blog Hop is coming!

Starting Monday!
October 24th

So grab your favorite blog hopping beverage,
settle into your favorite blog hopping seat and click around to see what I and 50-some others have come up with to inspire you with this ghastlie gang.  Guaranteed fun!

Be there or be square!
 hahaha...I had to say it!


Friday, October 14, 2011

You Are My Inspiration!

You are SO much my inspiration, that I've moved you to the top of my blog.  Actually, I saw you all (and many, many more) on another blog and loved seeing you there.  So I rushed right over here to put you there on mine as well.  But now I can't remember where I saw this.  It's the first time I saw followers at the top and I just felt that's right where you should be because most of the time you are the ones who inspire me ... on your blogs and on flickr.

I gave you a title, "Let's follow each other and be Inspired" but that part hasn't shown up.  I wonder why.  Well, yet anyway.

Thank you all for inspiration and thanks for your visits!
Annie


Wednesday, October 12, 2011

A New Halloween Quilt

...someday!

I can't wait to make another Halloween quilt!  I really want to try one of those jelly roll quilts...or at least a variation of one.  Especially after seeing them in this blog post.
I haven't really seen a jelly roll of Halloween fabrics that catches my fancy, so I've decided to make one up for myself.  I have 12 fabrics strips ready to go.
And when I get back to my stash in Wisconsin, I'm sure I won't have any trouble coming up with the other 30 fabric strips needed to make the quilt.  The sad news?...that won't happen until next Spring/Summer!...at least I hope it happens by then...oh, woes me...!

Thanks for stopping by.  Any and all sympathy is appreciated!
Annie


Tuesday, October 11, 2011

A Little Weekend Jaunt

Along the Pacific Ocean coast.  It's so nice to know the ocean was right where we'd left it some 20 odd years ago.
And just as beautiful, too!
We couldn't have asked for a more beautiful October day.
These photos are taken in Monterey, California.

Toto, I don't think we're in Wisconsin anymore... (although I've heard it's been pretty nice in Wisconsin for October!)

Friday, October 7, 2011

Throw Quilt #4

This is only my 4th "large" quilt.  45" X 76"  It's just a simple whole cloth that I added borders to.

It's Dad's Christmas present.  He always likes the whole cloth backs of my quilts better than the pieced fronts.  I'm not sure how to take that.  In any case, this old house is cold and he's elderly and he uses quilts a lot!  He's worn out the ones my mother has made for him.


A length of fabric isn't wide enough so I add borders on the front and back.  You know, those borders are NOT the easiest thing to line up when you sandwich the layers!...and they HAVE to be lined up.  I do my own quilting with my Bernina 1230...it only has a 7" throat...not the easiest thing to do, but the most affordable, so it's straight line quilted in one continuous line.  Meaning I didn't sew from edge to edge and cut threads.  I stitched a continuous line from side to side from one end to the other in only the quilt center section.  That meant that when I was close to either end the entire quilt had to be inside the machine throat...yep, I'll be trying to avoid that situation in the future!

do

I haven't decided whether I made the right choice for the binding or not.  A solid might have looked better.  I hardly ever think to consider solids...there are SO many prints and I love them all so!  Dad is going to say it has clown stuff all around it...I'll just betcha he does.

And then there's that perfectionist illness I am afflicted with.  I couldn't just piece my bindings end to end.....those stripes HAD to match!


When you line those up 6 or so times, it gets easier as you go along.  I think I done good...only ripped out one for a redo.

So, one name crossed off the Christmas list as done...YES!

The quilt top fabric is Williamsburg Fok Art Village by Windham Fabrics Pattern No.31910 (according to the selvage).

Thanks for stopping by,
Annie


Tuesday, October 4, 2011

Tutorial: Fun Stripe Border

I have been having the best fun with this stripe border.


And I want to show you how I make it.
You guessed it...paper piecing!


I just cannot get anything like this straight or uniform in size by cutting the pieces and sewing them together.  Paper piecing comes to mind as a solution for the simple fact that paper will not stretch.
If you've had trouble with my ice cream cone tutorial, this one may just clear up some of your confusion, as this is the exact same technique and process but on a very basic level.

I know this is a lengthy tutorial, but I don't plan on any more paper piecing tuts. If you can't figure it out now, then you must pay my travel expenses to come to you for hands on personal training. LOL


These next photos just continue to walk with you through the continued process.  After the first block of white, I work with the entire fabric strip to cut waste and not worry about whether my fabric piece is long enough to work with.


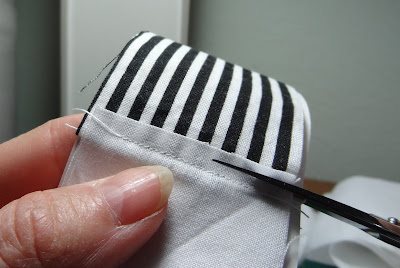
When your strip is complete, you can trim the long edges to have a 1/4" seam allowance ready to sew to your project. 

Have fun and I want to see your borders,
Annie