Saturday, July 8, 2017

Organizing


I've done a long overdue bit of organizing with these small file folders made from scrapbook papers.


I have this "broken latch" plastic box where I store my stamp placement templates.  A Misti doesn't work with wood block stamps.  I've created quite the collection of these templates.


It takes precious playtime to sift through them looking for the right one for the job.  


So it was time to organize them.  These beautiful scrapbook papers are mostly too busy for my taste for a scrapbook page.  But they are working fine for mini file folders.


I made them with my 1-2-3 Punch Board.  Directions are included in the booklet that comes with the board.  They can be made to any size you want. 


They're so cute, don't you think?


Here they are all labeled and doing their job.  They measure just 5.5" wide, 5" high.


It is so easy now to find a template without so much time wasted sifting through them all.


I put this little chore off just long enough to think of using these little file folders made with the punch board.

Tuesday, July 4, 2017

Color Burst+ Card

This is one of those art pieces that I look at and say to myself...I made this?

Yes I did, but I sure worked it to death to arrive here with this water paints background.


I started with the Color Burst Powders.  This time I put some powder on my little pallet adding water as desired.  That's funny because I sure don't know what I desire.  Then went on to fix areas that seemed to need something more.


Like that bottom section there.  I wasn't getting anywhere with more color burst. I learned later that you can't keep working a piece in a continually wet stage.  Watercolors don't work that way. 


Then I tried adding some fix with my Tombow markers.  Anyway, it seemed to reach an acceptable point, so I convinced myself to stop...while I was still ahead.  I ended up with that blotchy section.  I decided I could work with that by covering part of it with the butterfly I planned to add.


I embossed the illegible writing with white embossing powder.  Yes, I actually do use my black pigment ink when I want white embossing.  I love how sometimes a hint of black shows here and there under the white embossing.


Then came the butterfly painted with Color Bursts and body painted with the Tombow.


Carefully cut out.  I have yet to find a better pair of detail cutting scissors than these 4" ginghers. 


I have previously struggled to get my design piece centered on my base card.  I finally figured out a sure-fire way to solve that little detail problem.  I add the Scor-Tape to the back of my design. 


Then clamp the design to one end centered on my card base.


I remove the paper backing from the tape at the bottom of the design and also peel back some tape paper on either side leaving the started ends sticking out. 


Stick that bottom down to the card base.  That now will hold the design in place while I remove the clamps and tape paper from the remaining three sides and stick the remainder of the design to the card base. 


"Hello" is cut using a die.


The word and the butterfly are then glued atop the watercolor design.  That butterfly covering a portion of that blotch has made that blotch blend happily.


I only glued down the center of the butterfly so that his wings could flutter.

It was quite difficult to let this one-hit-wonder watercolor go off out of my sight.  But it now resides with a very worthy artist friend whom I knew would appreciate my struggles with it.  And I have my photos to look at.


A matching envelope was really beyond my capabilities.  But I needed something a bit more than the address scribbled to the envelope.  What fun would that be.  It, of course, didn't work so well as it was only a laser quality copy paper.  I used Neocolors for the color puddles.  I still think it turned out fun. So now I've invested in some Mixed Media paper large enough to make envelopes with.  For future watercolor use.


I might have been somewhat frustrated with this, but it was actually more enjoyable than not.  I always seem to wait for the other shoe to drop at the end and mess everything up.  I'm happy that other shoe did not drop with this card.  Sheila, it's more than rewarding that you love it.  Thank you! 

Sunday, July 2, 2017

June/July Calendar Journal

Another month flies by.  Not really.  Keeping these monthly calendar journals makes time feel like it's going a little bit slower.  I'm always thinking I'm farther along in the month than we are.  That is a nice feeling, I'll tell ya!  But June 2017 is history now.


July is ready for documenting.  It's always a bit difficult to NOT think in terms of a holiday theme during the month.


We are plenty patriotic in every other aspect of our daily life.


Sunday, June 25, 2017

Hello There!

I was looking for ways to use my Color Burst test pieces and a rejected background piece.
If nothing else it's darn colorful.


I do love how vibrant these powders turn out.

The supplies involved.


It was fun to put together an everyday type card that isn't part of a dated event list.  Now I'd better get back to cards for those upcoming birthdays.

Wednesday, June 21, 2017

Greeting Card Challenge

I've been working on my greeting cards self challenge.  I'm not behind with dates, but I am behind for my own comfort.  I like to be ready well in advance of the due date.

Of course Thank You cards get snuck into the mix as needed.  But I even like to have those ready to go at the spur of the moment.


I have not been good with process photos.  Mostly because I don't expect these watercolor techniques to turn out useable.  But these are most of the supplies I used.  I know that I enhanced the Color Burst watercoloring part with help from Distress Inks.


This is the first July birthday card I need.  And sometimes an envelope is just a waste of an envelope when it comes to guys who have no appreciation for them at all.  But this particular guy does appreciate my handmade cards.  


It's for Jay.  He's been mentioned in my Calendar Journals often.  Usually associated with Friday happy hours, Margaritas and Chocolate Frostys.


The fake blue watercolor technique for this card was created with Distress Ink and an ink dauber. It worked out fun. That roll of foil-like stuff is a found supply.  It also has been fun to experiment with.


Monday, June 12, 2017

Father's Day Card

Father's Day is coming up and I've made a card.


A very simple card made with scrapbook paper, gear die cuts, rubber stamps and brads.


I used three different stamps to create my inside sentiment.  I like the looks of the mixed fonts.


Sunday, June 4, 2017

May 2017 Calendar Journal

There was very little art time this past month, but my calendar journal means I get at least 1.5" X 1.5" of tiny creative time each day.  Sometimes that just has to be enough.

I realized that the fun scrapbook paper designs that I start with really get buried behind the writing as the blocks get filled in.


The little pocket on the 6th holds the list of guests that attended that visit.  And the pocket is held in place with 1/8" washi tape.  So narrow and delicate.  

I just love those stitches rubber stamps that my daughter found for my birthday.  The sloppiness of the stitches are really fun.  


I hope to find myself with a little more playtime in June.
Happy Summertime!


Saturday, May 20, 2017

Doctoring the Color Bursts

I've come to the conclusion that Color Burst powders are not a product for me.  This card is not completely unfortunate, but unfortunately Color Burst powders have kicked my butt.

Here's how this card started.  If you look quite carefully and with a magnifying glass, you will see the Color Burst powders.  You aren't supposed to have to use very much.  


I think maybe a little more is needed.  Which I did add some more.  The purple bottle especially seems to have more colors inside than just purple.  Hmmm.
  

I started over with the circles shown in the first photo and the one below.  But my Color Burst did not do much better at all.  Well I got out my Neocolor II water-soluble crayons and did some watercolor doctoring trying to save the poor card.  It was salvageable until I decided it might need a little something else.  I stenciled lightly the harlequin background.  I should have listened to myself when myself told me NOT to add a little something else!  Will I never learn.  


My daughter is getting this card anyway.  She's also getting a backup supply of Color Burst powders.

Sunday, May 14, 2017

Playing with Color Burst

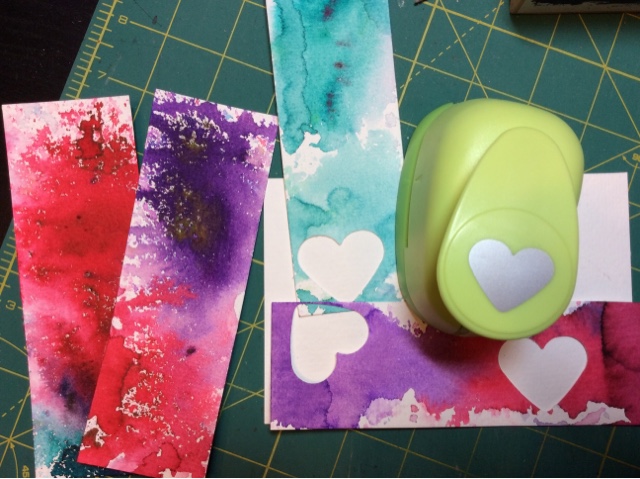
I received a set of Color Burst watercolor powders by Ken Oliver for my birthday.  My first play with them was a really dark ugly mess.  So far they've been really hard for me to control the powder.


This time around didn't start out much better either.  I would get either too little powder or way too much powder on the paper.  I tried squeezing small puffs of powder and tried shaking.  My daughter now tells me to tap.  So next time I will tap.  


I punched hearts from the better pieces,


stamped some words on them, inked the edges then stitched them to my card base.  Then added a tiny puffy heart sticker to each heart. 
The stitches on the left are a rubber stamp.  I love this stamp set that includes a variety of stitches.


I used two different sentiment stamps on the inside of the card.


My parents will be married 68 years come June 5th. 

Friday, May 5, 2017

April 2017 Calendar Journal

Here is how April went along for me.  It's my birthday month...a day way at the end.  Which makes it more fun to celebrate starting at the beginning.  Starting with turning the plain calendar page itself into a birthday party.


I wonder what May has in store for me.  Fun I hope...
"Girls Just Wanna Have Fun"!