Sunday, May 3, 2015

Scrap Busting

My scrap busting projects are so small, they aren't busting anything.  But I'm busting with delight.

There is absolutely no noticeable dent in my scrap boxes.  Oh, who cares!  The fun is all in the fun of creating.  If I really wanted the scraps to disappear I'd toss them out on their ear.

The season for many refreshing cold drinks is nearly upon us and I'm getting ready for it.

After the wild orange keeper, came the wild red bottle/can wrap.


These little gems are such fun to make!  They practically design themselves with little effort from me.


Following is a tutorial for my process.  

Get your scraps together and some batting, a lining fabric choice and velcro.


Cutting measurements:

Body:
Batting - 8-1/4" x 4"
Lining - 8-1/4" x 4"

Tab:
Batting - 3" x 1-1/2"
Lining - 3-1/2 x 2-1/4"

Binding:
1-1/4" x 30"

Rubber Grip Strip:
7-1/4" x 3/4"

Velcro strips:
3/4" x 2-1/2" 


Glue the grip strip to the right side of the lining 1/2" from the top edge.  (It will get sewn down while you stitch the scraps on the front.)


For the body, layer lining piece right side down.  Place batting over lining.  Begin placing fabric scraps randomly on the batting.  Move the pieces around until your design looks pleasing.

For the tab, the batting is cut just inside the seam allowance so as not to add bulk after turning right side out.  Use the lining piece as a guide for placing the fabric scraps.  Allow 1/4" seam allowance on three sides and 1/2" seam allowance to the remaining long edge.


Here's my layout for both pieces.  Before pressing and sewing, I remove the spiral from the body piece and the bunting from the tab.  Also remove the lining from the tab (it gets sewn on later).  

Press the pieces to the batting.  I also use a glue stick to tack a few pieces down to help keep the scraps together while in the process of stitching them down.


After stitching the bases of the body and tab, I fused and stitched the spiral and the bunting.  You will have guessed by now what a marvelous time I'm having with fabric spirals.  They are a fun added element to the design.


The backsides look like this.  

For the tab, lay the lining piece right side down over the scrapy side.  Stitch the 1/4" seam allowance around the three edges leaving the 1/2" edge open.


Trim off the corners and turn the tab right side out and press.


Layer the tab right side up centered on the backside of the body piece (unstitched edge to the outside) I use a glue stick to hold it in place.


From the right side of the body piece, stitch the binding on all the way around.  Press the binding away from the body.  This is how it looks from the backside.


I stitch the binding to the backside by hand.  This is how it looks at this point.


Fold the tab piece out over the binding.  Press.


From the right side, stitch the tab in place by top stitching on the binding.  The photo below shows how that looks from the backside.


Add the velcro hook piece to the backside of the tab and the velcro loop piece to the front of the wrap as shown.


All done.


Now put that fun wrap to good use.

CHEERS!

xxx
Annie

Sunday, April 26, 2015

Fabric Doodle Postcard

The Sunday Postcard Art challenge this week is Doodle
 (on your postcard).

Well, that fit right into my current passion for playing with my fabric scraps.  I'm not sure my Doodling with fabric and thread fits into the challenge, but I think it does.  Why not?


This postcard brings to mind the circus.  And I love a circus. 

The postcard back...


I loved playing with this fun theme this week.  Thank you Sunday Postcard Art. 

xxx
Annie


Thursday, April 9, 2015

Wild Orange Keeper

I have to keep some info with me at all times and it has been cluttering up my little purse.  I don't need it that close, just within access if needed on the spot.  I decided it was time to make a "Keeper" for this info.
I have been looking at my scrap boxes and wondering why I don't throw them out.  To me scraps are small pieces and strips of fabric.  I've been wanting to make new yardage with them, but then think, what then?  So they sit.  Now I've thought of a "what then" project.

My Wild Orange Keeper

From Instagram I've already had a request to share my process in its making, so here is how it came about...
I got out my orange scrap box and also my box of previously fused graphic bits that have been rejected for use for one reason or another.  At this point I am totally excited to be using some of both!
Some of the graphic pieces are from Lisa'a Altered Art and many are printed on Magic Fabic
I got out my scraps of batting.  Decided on a finished size for my keeper.  I wanted to be able to tuck in a quarter folded sheet of paper plus a bit more.  Then I cut off the flap corners.
I decided on a lining fabric and cut it to size.

Next I pulled scraps of orange then went looking for a couple of pieces of black for pop and layed them on top of the batting.  And then chose a few previously fused graphic pieces to add interest.  At this point you have to be mindful that the graphic pieces will all be right side up when the Keeper is sewn together.  So you'll notice that my flower and group of girls photo in the center section are upside down.


I removed my "shaped" graphic pieces to add on "after" my wild orange base is quilted.  Everything got quilted as raw edge applique...so-to-speak.

I mostly just pressed the whole thing with my iron before sewing the pieces down.  I did however, glue stick lightly a few key pieces that would hold the surrounding pieces in place. 


After the base quilting, I fused on the shaped graphics and appliqued them in place.


**What do you know, I actually fused the pieces going in the right direction.** 

Next I got my binding ready and stitched it across the bottom that gets folded up.


Looky there.  When I stitched the quilting, I should have used a yellow bobbin thread.  Ah well, it adds some interest...I suppose.

Next I stitched the binding to the sides and top. 


I was being hap-hazard and it looks horrid.  But I still shrugged my shoulders.  

I intended to sew on velcro.  But I forgot to do that before stitching the binding to the sides.  So I added a large snap instead.

The backside.

Look at this mess.  It's so crooked (but I managed to take a photo where you couldn't really tell how crooked it looks) and the binding just looks horrid!

I LOVE how the fabric scraps and graphics all turned out.  But I couldn't live with the mess I made.  I had to fix it.  I took the binding off, straightened the base piece, then used a narrower binding AND now I can live with it.  :-)

I liked the way my binding dots landed the first time around better.  But at least now I have a Keeper that I love looking at and it doesn't send my mind reeling about bad binding and crooked-ness.


I'm a happy camper with a right side up flower on the backside.  This was quick and fun to make.  Just the right distraction I needed from my current project.
Wishing you a wild orange kind of happy day!
xxx
Annie

Monday, April 6, 2015

House #6

The Tag It On challenge theme this time is 
A Rainbow of Colours

Hooray, another using of my Neocolors II.  (for coloring the house)
I hate when supplies are expensive then they just sit there staring at me, daring me to try and figure out how to use them.  


The number and words are stamped with Ranger Distress Inks.

And the back...

I'll bet you thought some sweet little old lady lived there.  :-)

Happy Tagging,
Annie


Tuesday, March 31, 2015

Spring Greetings

Happy Easter and Happy Spring
to Ruthie
and to Everyone

The bunny is from Nancy Halverson's book titled Easy Does It For Winter.

I really must learn to look at the photo "before" mailing the postcard...that stray fabric thread is driving me nutso!

Enjoy the season
xoxo
Annie

Friday, March 6, 2015

I'm Late!

My favorite tag challenge blog,
has a new fortnight challenge. 
---------------------------
White and a Number


Since he's already holding a pocket watch, I went with the expected "I'm Late" theme. 

On the back. 

It seemed like a good place to include some of my extra punched letters.  No meaning to them, just random letters I picked up. 

To all my sewing/quilting buddies, I'm working on a new quilt. Really I am. 

Don't be late!
xxx
Annie

Wednesday, February 25, 2015

I'll Give You My Heart

This is a 4X6 piece cut from my handy test paper pad.  I liked what I accidentally created on my test pad with this image.  I have been staring at it for months.  What to do with it.


I finally decided to recreate the work on an ATC sized tag.  I was working on her when the DragonsDream Tag It On challenge was announced...Pink and Hearts.  Well, I had the pale pink background.  But I didn't see a way to add a heart.  UNTIL I started cleaning off my desk top.  There it was, a leftover tiny fabric stamped heart from the Valentines.  The perfect final detail for her.  It was just what she needed.


On the back.


xoxo
Annie

Sunday, February 22, 2015

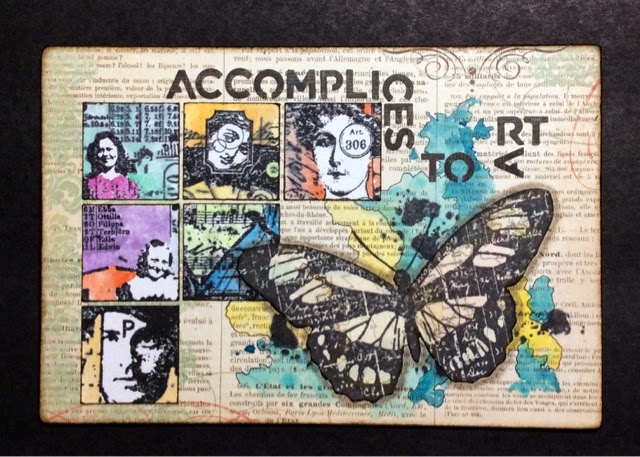
My Accomplices

The postcard theme this week at Sunday Postcard Art  is "Pieces of Pictures".  I'm awfully glad the theme was posted early to give me some time to think about it.  Odd theme, it stumped me.  In the end I took it literally.

I stamped several of my people stamps then punched inchies from the images.  Which gave me "pieces of pictures".  

These people, and the butterfly, are my accomplices in my art.


I painted the inchies with Neocolors.  I also bravely tried to make a watercolor blob under the butterfly.  Not great, but not too awful either.  (Otherwise it would be residing in the trash bin)  Then I finished with my new punched letters.

xoxo
Annie

Thursday, February 19, 2015

...so boring. NOT

On the blog Mail Art Projects Louise is celebrating her 55th birthday this year and her wish is to receive 55 art envelopes in her mail. 

I've had this envelope, not knowing where to send it. So I've added Louise's upcoming age to the design and will be sending it to her. 


I added a Happy Birthday note on the back along with some other small artistic touches and it's ready for the mail. I have a feeling Louise will be receiving much more than 55 envelopes for this birthday celebration. 

I do not know Louise at all.  I just want to help her celebrate her birthday with this great art envelope project. You can send her an envelope too if you are so inclined. 

Happy Mail Day!
Annie

Sunday, February 15, 2015

Heart Postcard

Hearts and Flowers is the theme this time at the Sunday Postcard Art blog.  I had this punched heart just lying around (not used when I made the ATC turned tag).  I love how the heart on that ATC turned tag looked.  I should know by now when a happy accident happens not to try and duplicate it.  But, it's not that bad.


I snuck that tiny flower in just for the challenge.   I purchased a large set of Neocolor II, but I'm not good with watercoloring.  But I need to use them!  They're just sitting there.  I colored the tiny flower with them.  hahaha...that's not saying much is it...haha  I really must find some ways to use them that works for me.

Do you like this?  Would you like to find it in your letter box?  Just say the word.  I love making postcards and all sorts of mail art.  But I cannot keep it all.

xoxo
Annie