Showing posts with label Cards. Show all posts

Sunday, June 3, 2018

Calendar Journals and Father’s Day Card

My May 2018 Calendar Journal is complete.


There’s a lot of cycling going on these days.  Bicycle LOVE!

Working on June now.


Father’s Day card


The envelope


That’s the extent of my creativity lately.

I’m getting back on my bicycle now as that is what I love doing most at the moment.

Sunday, February 18, 2018

Birthday Mail Art

Another very special birthday has come around that fast moving calendar.  For this mixed media card I dug into my selvage and trim stashes.  Did a bit of sewing them onto scrapbook paper.  Then added a Tim Holtz paper doll and typed and stamped the sentiment.


Then an artsy envelope was required.  I have not altered an envelope in quite some time.  So that was fun.


I especially have not altered an envelope back in an even longer time.  I’m fairly certain I went back later to add an edge to the “Letter” letters so that they stood out better.  But failed to update with a photo.  Not important, don’t sweat the small stuff...right?


Since I indicated on the envelope outside that there was a letter inside (not just a card), I did actually write a letter.  That also felt wonderful to do.  It was a nonsense letter as we email often.  That doesn’t leave a lot to say in a letter.  One must be a bit creative when writing a nonsense letter.  I’ll be working more on that idea.

A very Happy Birthday wish to you Sheila!

Tuesday, February 13, 2018

Hearts Mail Art

I love heart art any time of the year.  But February is the best.  This card has a full boat of mixed media and was inspired by Pinterest (as usual).


It has Color Burst, watercolors, acrylic paint, Washi tapes, stitching, embossing, rubber stamping and stenciling.  Posca Pen and Zig Writer for my fake splatters.


The inside needs to be fun too.  I wasn’t real thrilled with how that sentiment worked with the specialty embossing powder, so I jazzed it up with more Washi Tapes.  Finally I have new uses for Washi Tapes.  They collect so fast.  


I made this postcard at the same time with the same techniques and supplies.


A successful experiment for me.


And then there came this postcard.


Again, many of the same techniques with the addition of texture paste and shading with a graphite pencil.  

This paper art stuff is hard.  It does not come naturally or easy to me.  Many of these techniques are out of my comfort zone.  I’m trying to be more brave these days.  Some experiments are filling the trash bin.  So when I have a success, I celebrate with a very happy party feeling inside me.

Happy Valentines Day!

Sunday, February 11, 2018

Play Time!

Finally some time to play!  This is about how much sewing I feel like doing.  And that’s only because Antoinette likes it when I sew for her.  It’s been a while since I baked a fabric birthday cake.


This mixed media cake has fabric, thread, a bead string, rubber stamped candles, gem stones and Washi tapes, all on card stock.

From there I went to Pinterest for some inspiration to play some more.  I was inspired enough to try new techniques and supplies that have always seemed scary to me.  

I love the Tim Holtz paper dolls, but now I have them I don’t know what to do with them.  That baby is an odd shape.  I thought I was being pretty clever putting her on the man’s shoulders.


This is all watercolors and the dreaded Gesso.  I’ve set my mind to get along with Gesso.  We have not been friends.  I used texture paste over an alphabet stencil.  I tinted the texture paste too dark.  Painted over it with Gesso.  Then it was too light!  So, more watercolor then some shading, added lines behind the family with rubber stamping and finally some “fake” splatters in white and black.  


This was all experiement and not comepletely unfortunate.  So out into the world of mail art it went.

That was encouraging, so off I go to try more!

Thursday, November 23, 2017

Thanksgiving Card

I managed to make only a couple of Thanksgiving cards this year.


I also needed a Get Well card.


I wish everyone well.
and have a
Happy Thanksgiving

Tuesday, August 1, 2017

Watercolor Experiments

I've taken a couple of watercolor experiements and turned them useful.

This one turned into a postcard and went off into the mail.


Even the address side was stamped using watercolor paint.


This one turned out nothing like it was in my mind.  I wasn't sure which way I would use it.


Turned the opposite direction I saw a blue forest across the lake.


I needed a birthday card for my granddaughter who loves skulls at anytime of the year.  And blue is her favorite color.


This is what the blue forest turned into.


I'm glad some of my experiments are being useful.

Tuesday, July 4, 2017

Color Burst+ Card

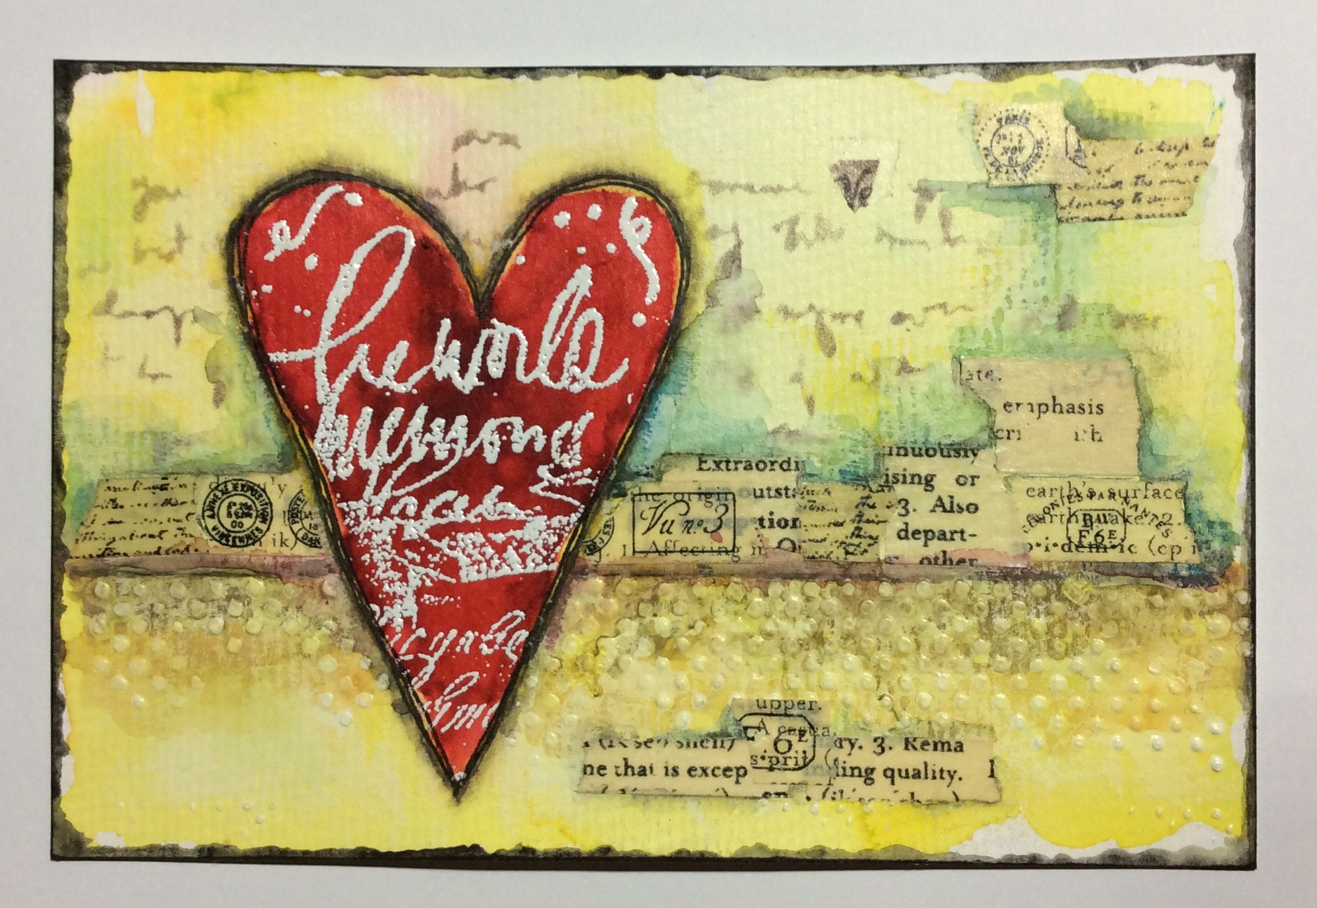
This is one of those art pieces that I look at and say to myself...I made this?

Yes I did, but I sure worked it to death to arrive here with this water paints background.


I started with the Color Burst Powders.  This time I put some powder on my little pallet adding water as desired.  That's funny because I sure don't know what I desire.  Then went on to fix areas that seemed to need something more.


Like that bottom section there.  I wasn't getting anywhere with more color burst. I learned later that you can't keep working a piece in a continually wet stage.  Watercolors don't work that way. 


Then I tried adding some fix with my Tombow markers.  Anyway, it seemed to reach an acceptable point, so I convinced myself to stop...while I was still ahead.  I ended up with that blotchy section.  I decided I could work with that by covering part of it with the butterfly I planned to add.


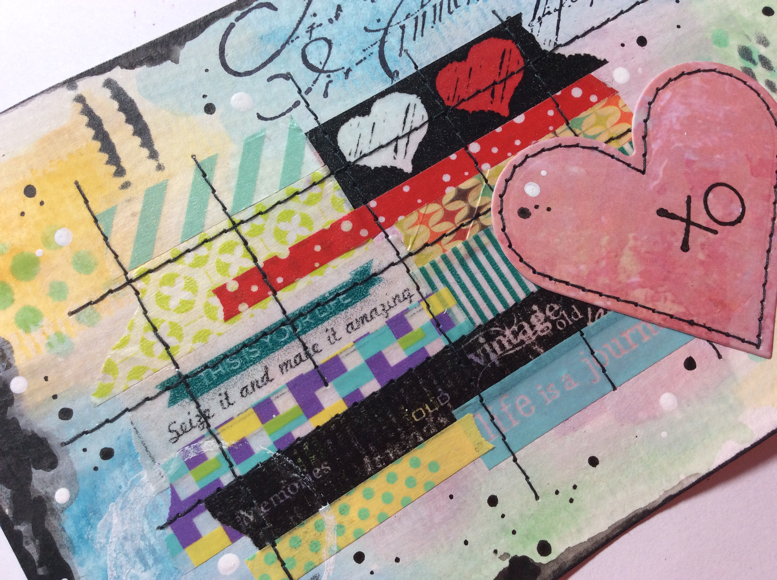
I embossed the illegible writing with white embossing powder.  Yes, I actually do use my black pigment ink when I want white embossing.  I love how sometimes a hint of black shows here and there under the white embossing.


Then came the butterfly painted with Color Bursts and body painted with the Tombow.


Carefully cut out.  I have yet to find a better pair of detail cutting scissors than these 4" ginghers. 


I have previously struggled to get my design piece centered on my base card.  I finally figured out a sure-fire way to solve that little detail problem.  I add the Scor-Tape to the back of my design. 


Then clamp the design to one end centered on my card base.


I remove the paper backing from the tape at the bottom of the design and also peel back some tape paper on either side leaving the started ends sticking out. 


Stick that bottom down to the card base.  That now will hold the design in place while I remove the clamps and tape paper from the remaining three sides and stick the remainder of the design to the card base. 


"Hello" is cut using a die.


The word and the butterfly are then glued atop the watercolor design.  That butterfly covering a portion of that blotch has made that blotch blend happily.


I only glued down the center of the butterfly so that his wings could flutter.

It was quite difficult to let this one-hit-wonder watercolor go off out of my sight.  But it now resides with a very worthy artist friend whom I knew would appreciate my struggles with it.  And I have my photos to look at.


A matching envelope was really beyond my capabilities.  But I needed something a bit more than the address scribbled to the envelope.  What fun would that be.  It, of course, didn't work so well as it was only a laser quality copy paper.  I used Neocolors for the color puddles.  I still think it turned out fun. So now I've invested in some Mixed Media paper large enough to make envelopes with.  For future watercolor use.


I might have been somewhat frustrated with this, but it was actually more enjoyable than not.  I always seem to wait for the other shoe to drop at the end and mess everything up.  I'm happy that other shoe did not drop with this card.  Sheila, it's more than rewarding that you love it.  Thank you! 

Sunday, June 25, 2017

Hello There!

I was looking for ways to use my Color Burst test pieces and a rejected background piece.
If nothing else it's darn colorful.


I do love how vibrant these powders turn out.

The supplies involved.


It was fun to put together an everyday type card that isn't part of a dated event list.  Now I'd better get back to cards for those upcoming birthdays.

Monday, June 12, 2017

Father's Day Card

Father's Day is coming up and I've made a card.


A very simple card made with scrapbook paper, gear die cuts, rubber stamps and brads.


I used three different stamps to create my inside sentiment.  I like the looks of the mixed fonts.


Saturday, May 20, 2017

Doctoring the Color Bursts

I've come to the conclusion that Color Burst powders are not a product for me.  This card is not completely unfortunate, but unfortunately Color Burst powders have kicked my butt.

Here's how this card started.  If you look quite carefully and with a magnifying glass, you will see the Color Burst powders.  You aren't supposed to have to use very much.  


I think maybe a little more is needed.  Which I did add some more.  The purple bottle especially seems to have more colors inside than just purple.  Hmmm.
  

I started over with the circles shown in the first photo and the one below.  But my Color Burst did not do much better at all.  Well I got out my Neocolor II water-soluble crayons and did some watercolor doctoring trying to save the poor card.  It was salvageable until I decided it might need a little something else.  I stenciled lightly the harlequin background.  I should have listened to myself when myself told me NOT to add a little something else!  Will I never learn.  


My daughter is getting this card anyway.  She's also getting a backup supply of Color Burst powders.

Sunday, May 14, 2017

Playing with Color Burst

I received a set of Color Burst watercolor powders by Ken Oliver for my birthday.  My first play with them was a really dark ugly mess.  So far they've been really hard for me to control the powder.


This time around didn't start out much better either.  I would get either too little powder or way too much powder on the paper.  I tried squeezing small puffs of powder and tried shaking.  My daughter now tells me to tap.  So next time I will tap.  


I punched hearts from the better pieces,


stamped some words on them, inked the edges then stitched them to my card base.  Then added a tiny puffy heart sticker to each heart. 
The stitches on the left are a rubber stamp.  I love this stamp set that includes a variety of stitches.


I used two different sentiment stamps on the inside of the card.


My parents will be married 68 years come June 5th.