Friday, August 26, 2022

Table Scraps and Orange

This month at The Joyful Quilter’s table scraps challenge, the color is orange.
That worked perfectly into my project to use up some leftover scraps/pieces.

I had some leftover half square triangles from this recliner quilt I made way back when.


And recently there was a slab of this piecing leftover.


They all came together for this scrappy orange placemat.  


I had begun a monthly block quilt-a-long before learning I don’t really enjoy making traditional sampler blocks.


So those would-have-been orphan blocks also were made into a placemat.


Then scraps from the Pink Stash Quilt also became a placemat.


The pink scraps did not lend themselves into much of an interesting design, so I made this section from a paper piece pattern called Diamond In Diamond by Sanjay Kilskinen that I found on Etsy.


Now I have three new placemats for dining...that are much more fun than what I had bought ready made.


It will be fun to add to this collection of placemats as I accumulate new scraps from new projects.

Thursday, August 18, 2022

Pink Stash Quilt

During a moment of nothing to sew because every project was waiting for something to come in the mail or for me to drive to the quilt shop to get what was needed, I joined the Moda Fabric’s Blockheads 4, 28 week quilt along.  I intended to sew the blocks from my stash of pink fabrics.  I quickly added in some greens.  (Neither stash color is any less from this effort.)


Instructions were included for both 9” and 4.5” quilt blocks each week.  They also threw in some bonus blocks every couple of weeks or so.  I managed to keep up for several weeks before deciding that sewing traditional quilt blocks and cutting the menagerie of little pieces was really not my thing.


I had this many blocks by that time.


I decided it could be a baby quilt...until I thought it might make a baby crazy looking at that wild mess.  So maybe it would be a small lap quilt (for my old age).

I needed five more small blocks.  It was depressing to think about making them from the quilt along’s block designs.  So, in true Annie fashion, I went my own direction and made five paper pieced hexie flowers from a pattern by CenterStreetQuilts on Etsy.


I laid out the blocks, added a border, pin based the layers and made it a quilt.


Layout was a struggle and in the end, as I was trying to scatter the hexie flowers, I forgot about other appearances of block placements.  Other than that miner offense, I’m liking this wild mess of a little quilt.


I did that border/binding thing again that I found I liked in my previous quilt.  Now I’m finding it hard to get away from it in other items I’m working on.  I really like the way that looks.


This little gem measures 43” square.


This hexie flower was a bit too light for the quilt but was perfect for making a postcard with.


For me, a postcard is always a happy ending to a project.

Monday, August 8, 2022

Fall Raven

I’ve revisited making a denim raven art postcard.


I’ve stitched the raw edge applique a bit farther into the bird with hopes of getting a more feathered look for him.  I’m much happier with his look this time.  Of course some areas will not fray as much but that is to be expected with fabric.


I love those Fall leaves die cut from that Tim Holtz Eclectic Elements fabric.

Again I used Miracle Fabric for the correspondence side.  A rubber stamp and archival ink for the words.


The two postcards together.


Dies used:
Rachael Bright Sizzix Bigz die Birds
Tim Holtz Sizzix Thinlits dies Leaf Fragments

Friday, August 5, 2022

Abandoned2 Quilt

I could not resist this Tim Holtz, Eclectic Elements Abandoned2 fat quarter bundle.  As soon as it arrived I prewashed the fabrics and began cutting into it and sewing.


To really get the fabrics all mixed together I decided on the Economy Block for this quilt.  I staggered the blocks slightly.


Of course I needed some of the selvedge included in the quilt design.


The quilt measures 57” X 68”


I just love all the colors and the grunge.


The back and the binding are the same fabric.


I did not want a border, but I needed a border or I would loose all the points of the economy blocks around the edges when I added the binding.  I sewed a scrappy border of many of the prints.  I cut strips 1.25” wide.  After the quilting was finished, I trimmed the quilt so that the borders were 5/8”.  That left a thin 1/4” border before the 3/8” binding.  I really like the look of it.  I will definitely do this again and probably again and again....


It was somewhat frustrating and disappointing working with this bundle.  When there is text on a print, it seems to be a crap shoot whether they will be printed straight on the fabrics.  Most of these were wonky.  Some more so than others.  I could have trimmed the pieces to be straight but I would have lost a lot of useable fabric that I needed (and paid for).  All together they make a pretty busy quilt and are hopefully just not that noticeable.


My July 2022 calendar journal.


Friday, July 29, 2022

Skeleton Collars & Cuffs

Skeleton Collars & Cuffs is the third of four gifted panels.


I gave him a border of black, orange and brown fabrics.  My original plan was for the wider strips, but for a wall hanging, it was going to get too large and out of proportion.  So I simply cut the original strips in half.


I staggered the strip lengths.


Of course the selvedge had to remain as part of the finished panel.  


There was a lot of blank space in this panel.  Since he’s sewing, I gave him some fabric scraps scattered around him.  Stitched down with raw edge applique.  They also provided more color for the panel.


To finish, I just did some echo quilting and then some straight lines here and there to fill in.


Quite a dapper fellow, wouldn’t you say?

Friday, July 15, 2022

The Night Watchman

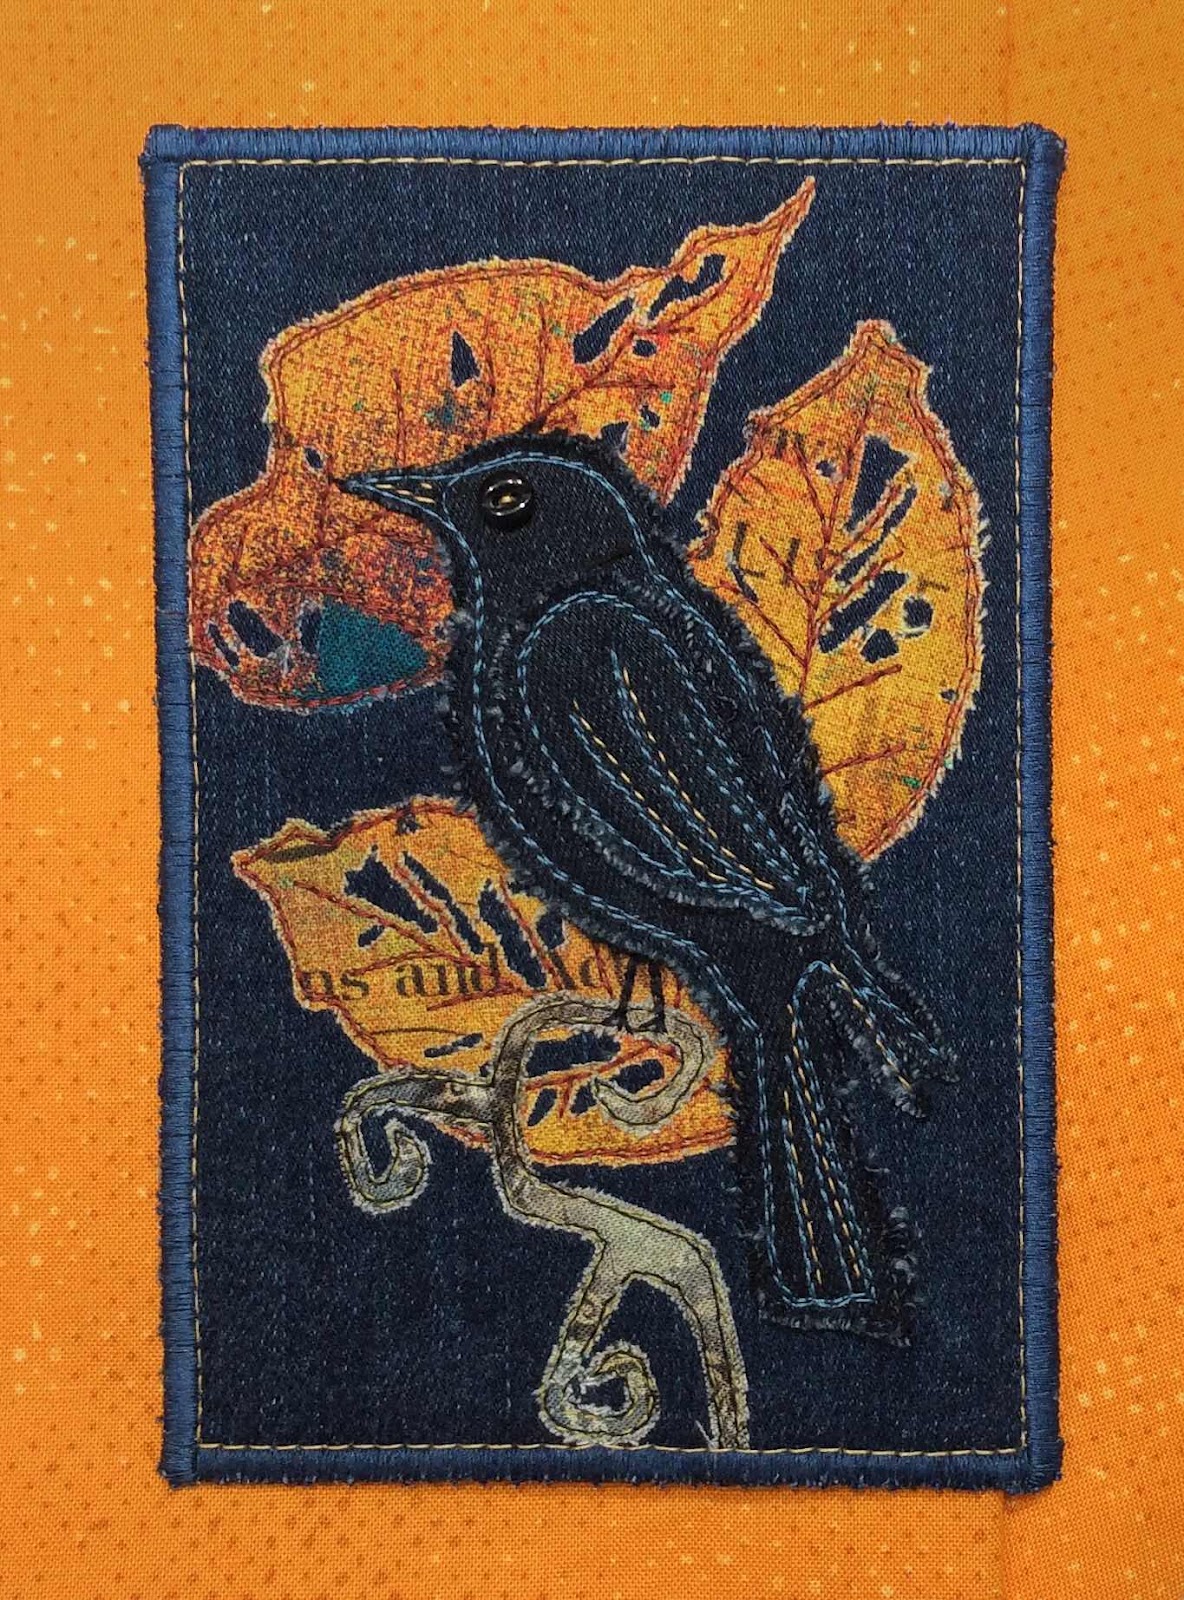
When I saw THIS POSTCARD by robertovnaelena (Instagram), I was immediately in love!
I wish she’d send it to me...(sigh)

I know that won’t happen, so I had to try making one myself.  Nowhere near as impressive, but he’s my version.  Not completely unfortunate, right?  I’ve had to call him a blackbird as he’s just not raven enough looking.  I used a bird Sizzix die to trace.  (I wish I could draw!)


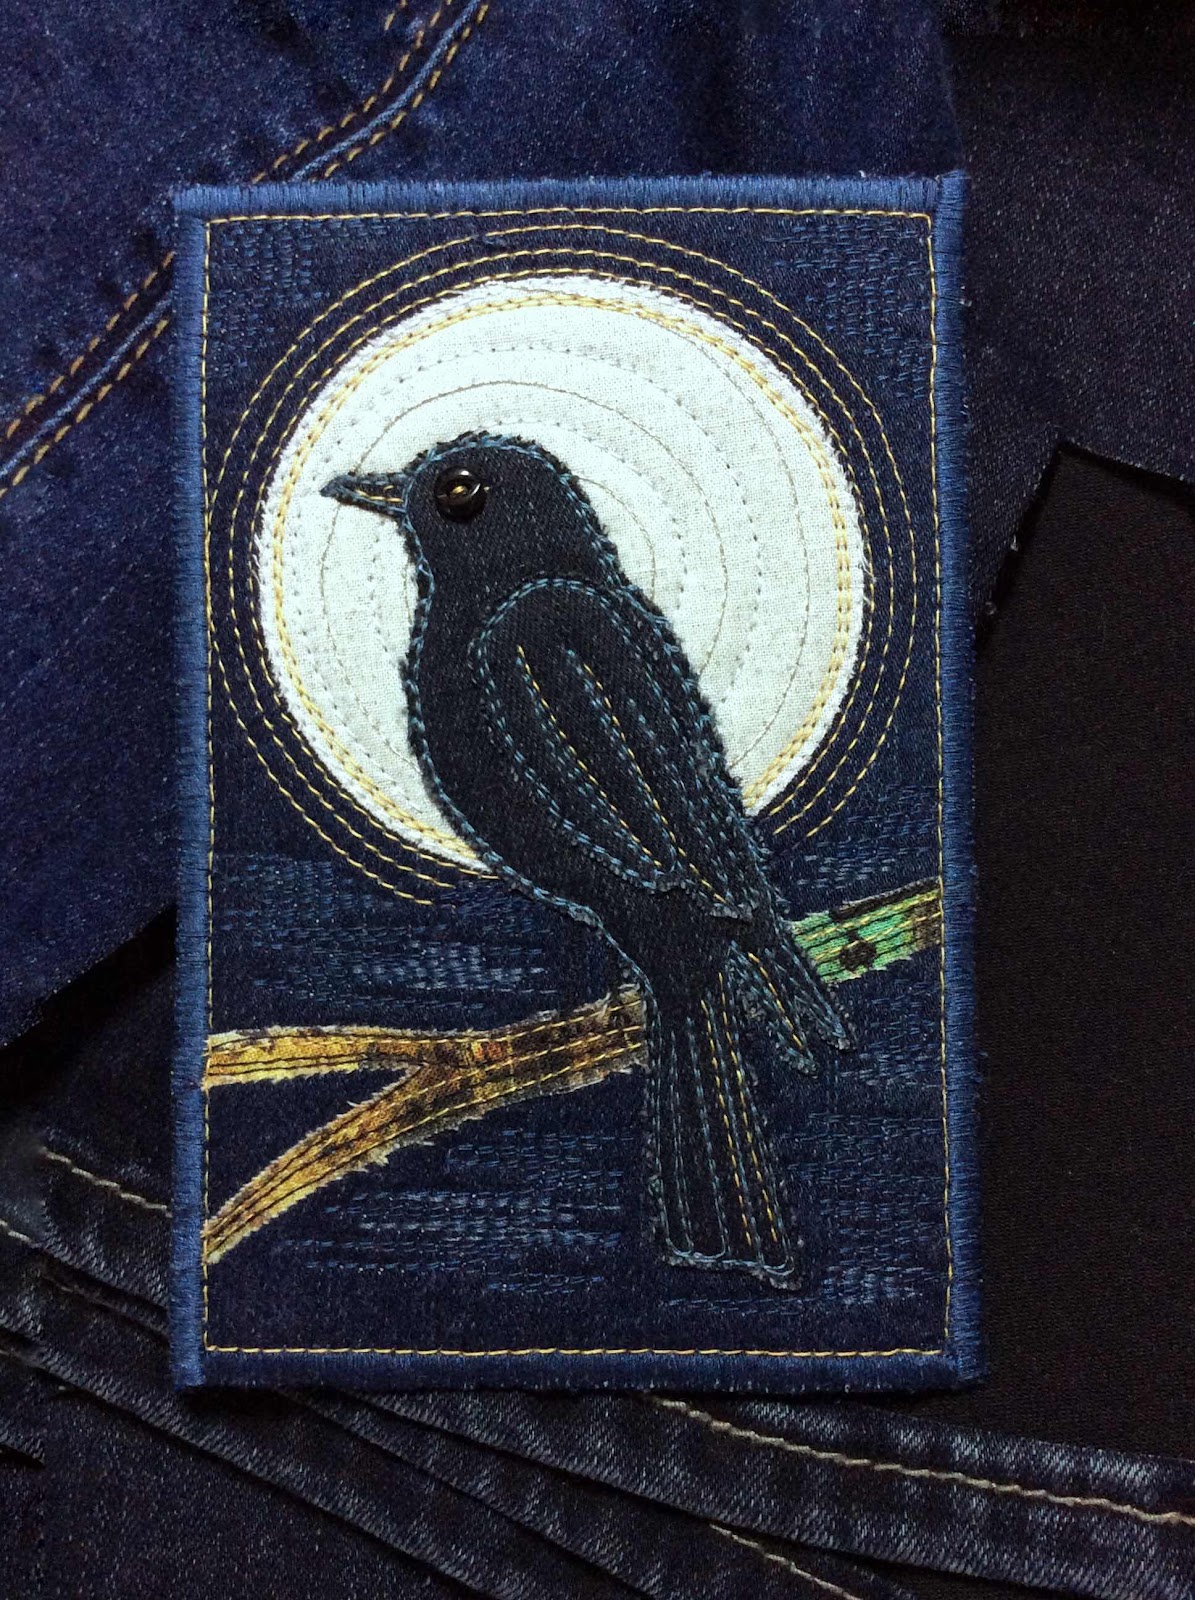
I also wished I could figure out a couple of her techniques, but I didn’t really want to copy right down to every detail.....YES I DID!

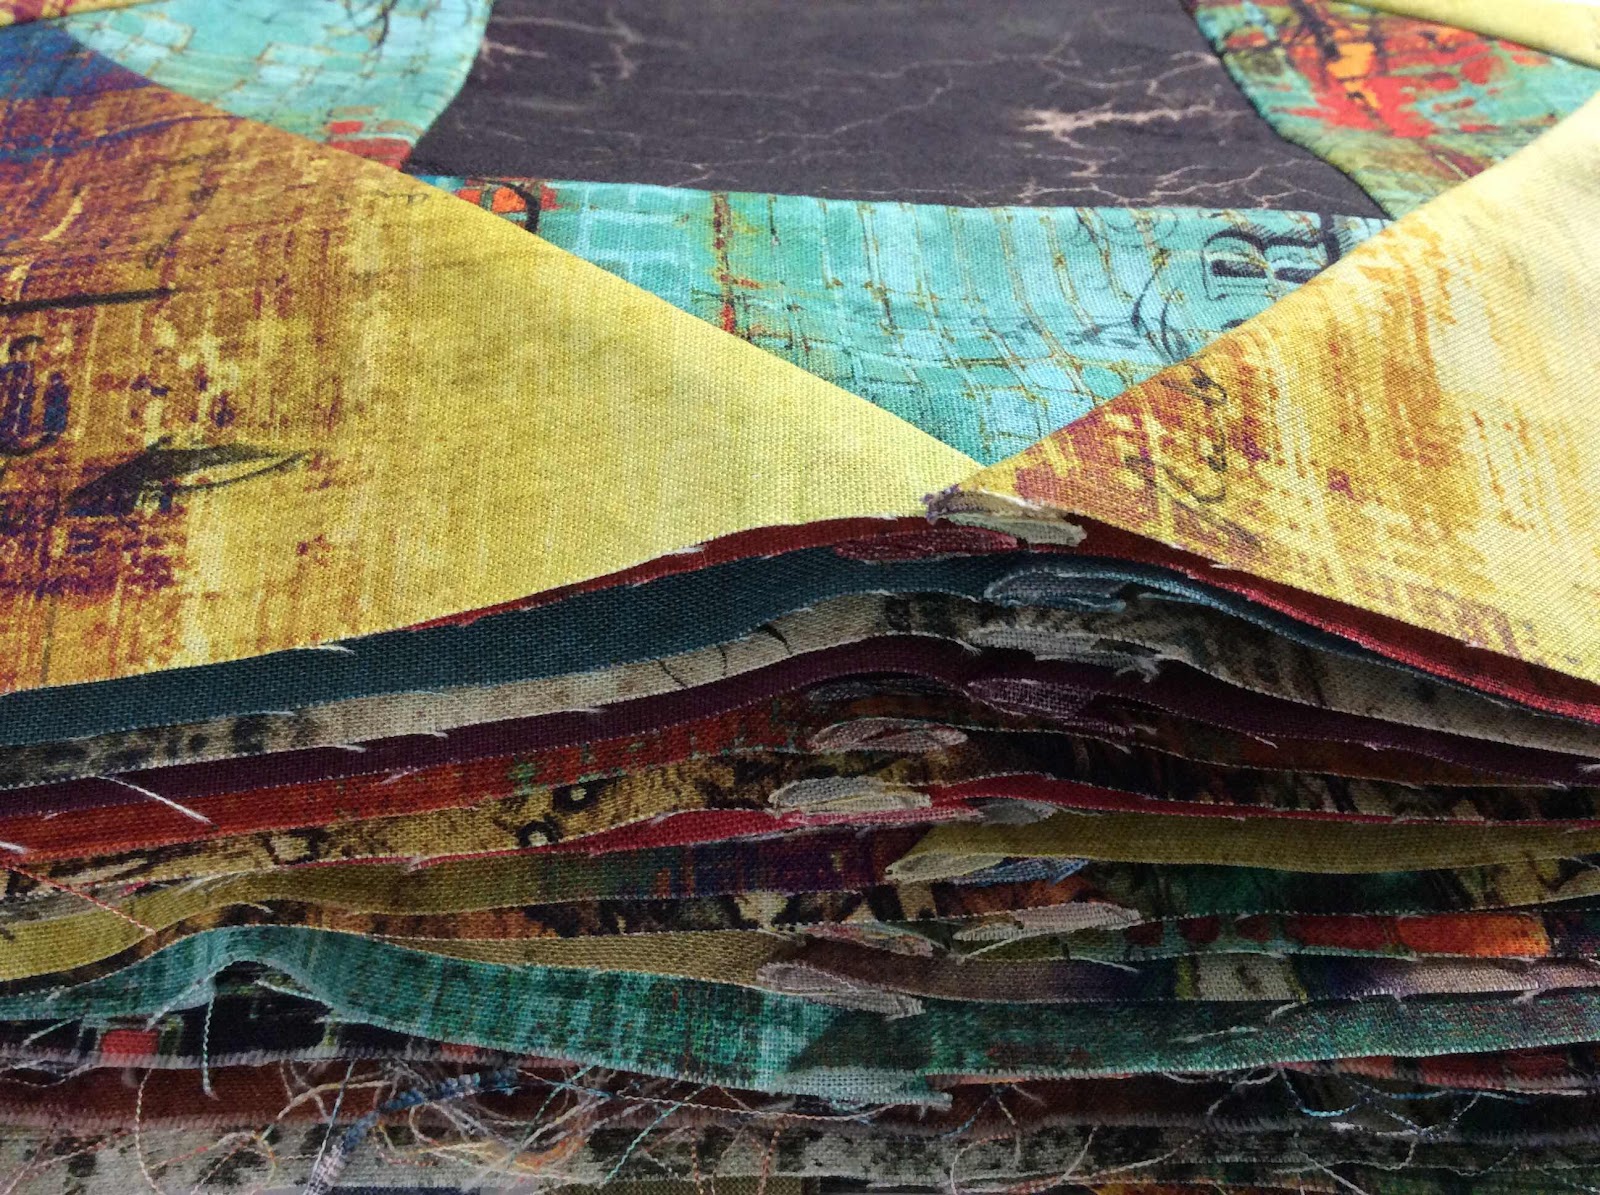
He’s made from discarded jeans.  A couple of different denim shades.  The moon in this 2nd photo is closer to the actual fabric color.  It’s more a grayish white with silver metallic specks. I first stitched a spiral using silver metallic thread in the bobbin.  I used the wonder under paper that I peeled off the fabric moon to trace a spiral then stitched it from the backside of the postcard.  It needed more thread painting so I stitched between the spiral stitches with regular thread in a cream and then some outside stitches in the gold.

I think if I had stitched the raw edge of the bird a little farther in, I might have been able to ravel the denim edges a little more so they’d look more feathery.


Are you curious about how my postcards look on the Peltex side?


I normally sew a binding around the edges of my postcards.  That’s because I have felt it looks better than zig-zagging. But this artist’s satin stitching on her postcards looks so great, I decided to try that myself too.  Hoping my satin stitch would fill in as nicely as hers did and only going around the outside edges once, I was not disappointed.  My corners need a little work.  I’m okay with that.


Secret ingredient:  At times, satin stitching doesn’t always cover completely or a stitch length will show.  I go looking for a permanent marker the same color as my thread and I camouflage those tiny areas.

Because I am not mailing this postcard to anyone, I used miracle fabric on the correspondence side.  Very adaptable to rubberstamping and writing (if I were to mail it).  I also did not want to test the satin stitched edge with paper after all my work on the design.  But I will be testing it with paper soon!


I have a lot of discarded jeans left, so I’ll be thinking up more denim postcards.

Happy Mail Day!

Thursday, July 7, 2022

Postcards and Calendars

When a break from quilting is needed, fabric postcards are being created.

This postcard collage is created entirely from scraps left from a quilt in progress using Tim Holtz Eclectic Elements Abandoned2 collection of fat quarters.


This next postcard is tiny flying geese.  A paper pieced pattern by Quilt-a-Rie that I reduced to fit a postcard size.


 This VW Bug (Beetle) is a paper pieced pattern by Full Bobbin Designs that I changed to applique and reduced to fit a postcard.  My very first car was a green 1967 VW Bug that I named Stanley.


This train postcard is an applique pattern by Angel Lea Designs.  Also reduced for a postcard size.  I fashioned my train after the 4017 Union Pacific Big Boy engine on display at the National Railroad Museum in Green Bay, Wisconsin.  Quite the impressive giant.


This last Poppie postcard is a pattern by Tina Curran.  It is a paper pieced pattern that I adjusted in size for a postcard.  This is a favorite.  The original pattern is like a field of poppies art quilt.  


To catch up with my calendar journals, here are May and June.


Wishing all a happy mail day!

Tuesday, June 28, 2022

Stars & Stripes Table Mat

I’ve completed this patriotic table mat in time to enjoy it for a week or so.


The center section is inspired by a painted wood plaque that I saw online somewhere (that I cannot find now to give credit).  I made the design using half square triangles.


From there I gave it borders using more half square triangles.  Then strips of fabric around the outside border.  24” X 24”


I quilted the mat with star shapes.


The stars are all die cut in two sizes then raw edge appliqued.

Hooray for the red, white and blue!
Happy Independence Day, America!